
Whats in the kit bag?
I wanted to share with you all my kit list along with how I use each item and its pro’s and con’s. This is all opinion based on the knowledge I’ve accrued over the years. If you have any questions or queries, feel free to ask in the comments at the bottom or drop me an email.
In addition to this kit I do hire other items from time to time for commercial gigs. I am lucky enough to be based in London, so many places to hire equipment, but I often use Fat Llama; a peer-to-peer rental company, you can list your own kit and have people pay you to hire your kit, or you can find most equipment to hire locally from other photographers. Lenses can be as cheap a £10 a day, so in the case I need something special for a job; like a specific macro lens, I’ll hire for the job.
Cameras

Panasonic Lumix S1R
Use: This is my go-to for pretty much all things commercial, its my main camera body. I’ve been using it 6 months now and found very few flaws with it. For me one of the most important things is how the camera feels, the ergonomics, how easy it is to change settings, etc. The S1R feels great in the hand, it feels like a DSLR (and a lot larger than its competing mirrorless bodies, such as Sony). Some may prefer the smaller bodies, but I find they feel odd in the hand and less sturdy. That said for every day life it is a little too large, I can’t swing it on the sounder for a short walk around…well I could but equipped with lenses it is pretty sizeable and weighty…and for that reason I have the Leica Q (below).
Pros: Great ergonomics - feels great in the hand, and easy-to-use (touch) menu system. 47MP sensor, meaning you can take some ridiculously detailed/sharp images, there is even a high resolution mode allowing you to shoot a 187MP image…thats insane! In-body and in-lens stabilisation meaning you can shoot at a 5th of a second, possibly longer if you have a super steady hand, this means you don’t really need a tripod in most instances and can be out shooting into blue hour without any issues. It is built like a tank; fantastic weathering, and I’ve already put it through all kinds of environments. The EVF (electronic view finder) is awesome; coming from an optical view finder (previously I have the Canon 5D mark IV) I guess it can be a little strange when you are used to looking through a mirror, but the EVF allows you to see the exposure in real-time and nail it, every time. The Lumix S1R (and S1) have an EVF resolution of 5.76 million pixels - the sharpest/best on the market, when looking into it your eye can still tell its a screen you’re looking at but it has an insane amount of detail.
Cons: A bit too bulky to use casually/out on the street but not impossible. Continuous AF can make the EVF

Leica Q - Full-Frame Compact Camera; fixed 28mm f1.7
Use: This is my baby, I love it, its a full-frame and small, I can fit in a jacket pocket or throw it in any backpack, its an absolute pleasure to use also and the images it creates (I think down to the lens are just beautiful and flawless)…and looks pretty awesome I think! Whenever I head out I have this with me, if I go hiking i’ll have the Lumix S1R in the bag, and the Leica Q around my neck or shoulder ready to shoot if I don’t have time to take the Lumix out the bag. If I am shooting Events I have this around one shoulder as a 2nd body, and have the Lumix with either the Lumix 50mm f1.4 or Sigma 85mm f1.4.
Pros: It’s small, its full frame, it has a super fast and perfect lens, it’s simple to use, it has a macro setting, it’s EVF is super sharp, and detailed.
Cons: It’s a compact so you can’t change lens, but 28mm f1.7 is good for me, and you can crop in to 35/50mm equivalent in the camera settings.
Lenses

Panasonic Lumix 24-70mm f2.8 S PRO
Use: I tend to use this for commercial work or if i’m out hiking or an adventure. It’s a stellar lens, super sharp corner to corner. I love the range 24mm being pretty wide without too much distortion and 70mm a good crop in, perfect for detail, portraiture or even just bringing the background into the image a bit more.
Pros: Perfect glass, corner to corner; so so so sharp! In-lens stabilisation, when combined with the in-body stabilisation of the S1R, and its awesome ISO really allows you to shoot into low light with no hassle. Good range 24-70mm.
Cons: Not great when shooting fast moving subjects in low-light…for this I would use a prime lens (below)

Panasonic Lumix 50mm f1.4 S PRO
Use: Pretty much portraits and really low light imagery. The bokeh from this is insane. Out of all my lenses this creates the nicest images! It brings to life it’s subjects, no idea what they put inside it but it works hard for you and its the sharpest lens I own!
Pros: Low aperture, super sharp, beautiful and outstanding bokeh.
Cons: One of the most expensive prime lenses on the market.

SIGMA 20mm f1.4 DG
Use: This is my widest lens; I use for a variety of things - basically whenever I need a super wide shot. Landscapes, astrophotography, some architectural shots…but in this instance I usually hire a 16-35mm.
Pros: A wide lens, with a wide aperture meaning you can shoot in very low light; really perfect lens for shooting the stars or blue hour landscapes without a tripod.
Cons: A bulbous lens, meaning you need to buy an additional fitting should you ever wish to use a filter. Also for this same reason it can lead itself to being more exposed and potentially scratched.

SIGMA 85mm f1.4 DG
Use: I do love this lens; incredible bokeh, pretty much all the Sigma Art Lenses are Bokeh beasts. This is a go-to for Portrait photos, I find when taking a headshot the perspective feels very natural; almost how the viewer would see that person should they be there. I use this lens quite a lot when shooting events as well; I find it’s great at bringing the viewer into a scenario; for example if a 3/4 people are chatting and laughing, or one is telling a story; it’s really nice to shoot them between the others in the group or over their shoulder. I will also use this lens commercially for a similar reason. Also in the field when shooting I sometimes use to bring the distance forward; a really good way to create scale and set a scene (depending on the setting I will use the 85 or the 135 (below) for that.
Pros: Dreamy bokeh. Fast lens when shooting at f1.4; super sharp too.
Cons: Heavy (1.1kgs), and bulky; with the lens hood on its 20cm in length

CANON 135mm f2
Use: I usually use both out in the field and at events intermittently when I need that extra bit of reach.
Pros: Light, and fairly small. Fairly affordable now
Cons: Not as fast at f2 (but still faster than a zoom lens :) At the moment I am using a SIGMA Canon to L-Mount lens adapter for this lens and the autofocus isn’t great on this, but I use manual focus for this lens on the S1R which it so precise its not too much of an issue. At some point in the future I’ll look to acquire a L-mount 135mm.
Drone

DJI MAVIC 2 ZOOM
Use: All arial photos and imagery; I chose the Zoom over the Pro as I really liked the idea of the zoom function, as for some aerial images I can zoom into 48mm and take multiple images and stitch them together to make one large image. As it only supports a 12MP sensor this really helps to make a more detailed, larger image.
Pros: Zoom function, offering a photographer a whole new range of angles they could never achieve before. Drones still baffle me; what incredible bits of technology!
Cons: Not as good in low light and a smaller sensor than the Mavic 2 Pro
Film Cameras
I am not a big film photographer but do enjoy it from time to time, and something I want to pursue further. I have these two film cameras that I can use together; the Konica 50mm f1.4 - great in low light, and incredible bokeh, and the Olympus 35mm f2.8. They’re just a bit of fun!

KONICA S2 - Compact Camera, 50mm f1.4

OLYMPUS OM-1, 35mm f2.8 and 50mm f1.4
Storage

STORAGE SET-UP:
WESTERN DIGITAL - MY BOOK 12TB
The mothership, my main storage, all photos from 2011 are on here, and give me access to everything I’ve ever shot. RAW files from events (not weddings) are deleted after a few years to ease up a bit of space, but otherwise all is here. It’s fairly full so probably need to re-think this before the end of 2020.
WESTERN DIGITAL - MY PASSPORT (Various Sizes) X4
I have always used WD Passports, and (touching wood) they have never failed me; the only hard drive to have failed me was a Seagate in 2018. I keep one of these with all my essential projects and images at my parents house, then I have 2 that are full; covering 2011 - end of 2018. Then the one I currently use with all of 2019, and 2020 on. I take this with me in a case on all my trips, and backup as I shoot, usually at the end of each day if I can, leaving the images on the memory cards as well. When I get back to my house I back-up the WD PASSPORT to the WD BOOK.
GOOGLE DRIVE
Full of all files; personal and business, no (very few) photos.
DROPBOX
Full of images; I do categorise into projects/trips, sometime I store RAW images, but most of the time it is just final edits of JPEGs.
Flash System
GODOX TTL XPRO
A wireless trigger that attached to the hot-shoe of your camera and allows for my camera body to communicate with both TT685’s and AD360 (below)
GODOX TT685 (X2)
2 speedlite flashes I use; sometimes I use one on the hot-shoe in an event, sometimes I use both remotely using the trigger; maybe in a portrait or a product shoot, they actually create a surprisingly large amount of the light; if used with a good softbox you can create some really beautiful soft light portraits.
GODOX AD360TT
This is a little larger in size and power; I tend to use for portraiture shoots as it creates a lot more light, and can use in a larger softbox. It fits inbetween a speedlite and a studio flash.
SOFTBOXES: 100cm Octobox, 70cm Octobox, 50cm Octobox
I love the soft light the 100cm Octobox creates when using it with the GODOX AD360. A real premium portraiture look. The 70cm Octobox with a Speedlight in the ring also creates nice light, I take this set up travelling sometimes if I plan to take a few portraits, it can be a real space-saver set up, the oxtobox folds down to a 40cm tube, and a ring, then the flash is the size of a lens.
Thats all for now folks! Should you have any questions drop me an email or write in the comments below:
Cycling the Outer Hebrides
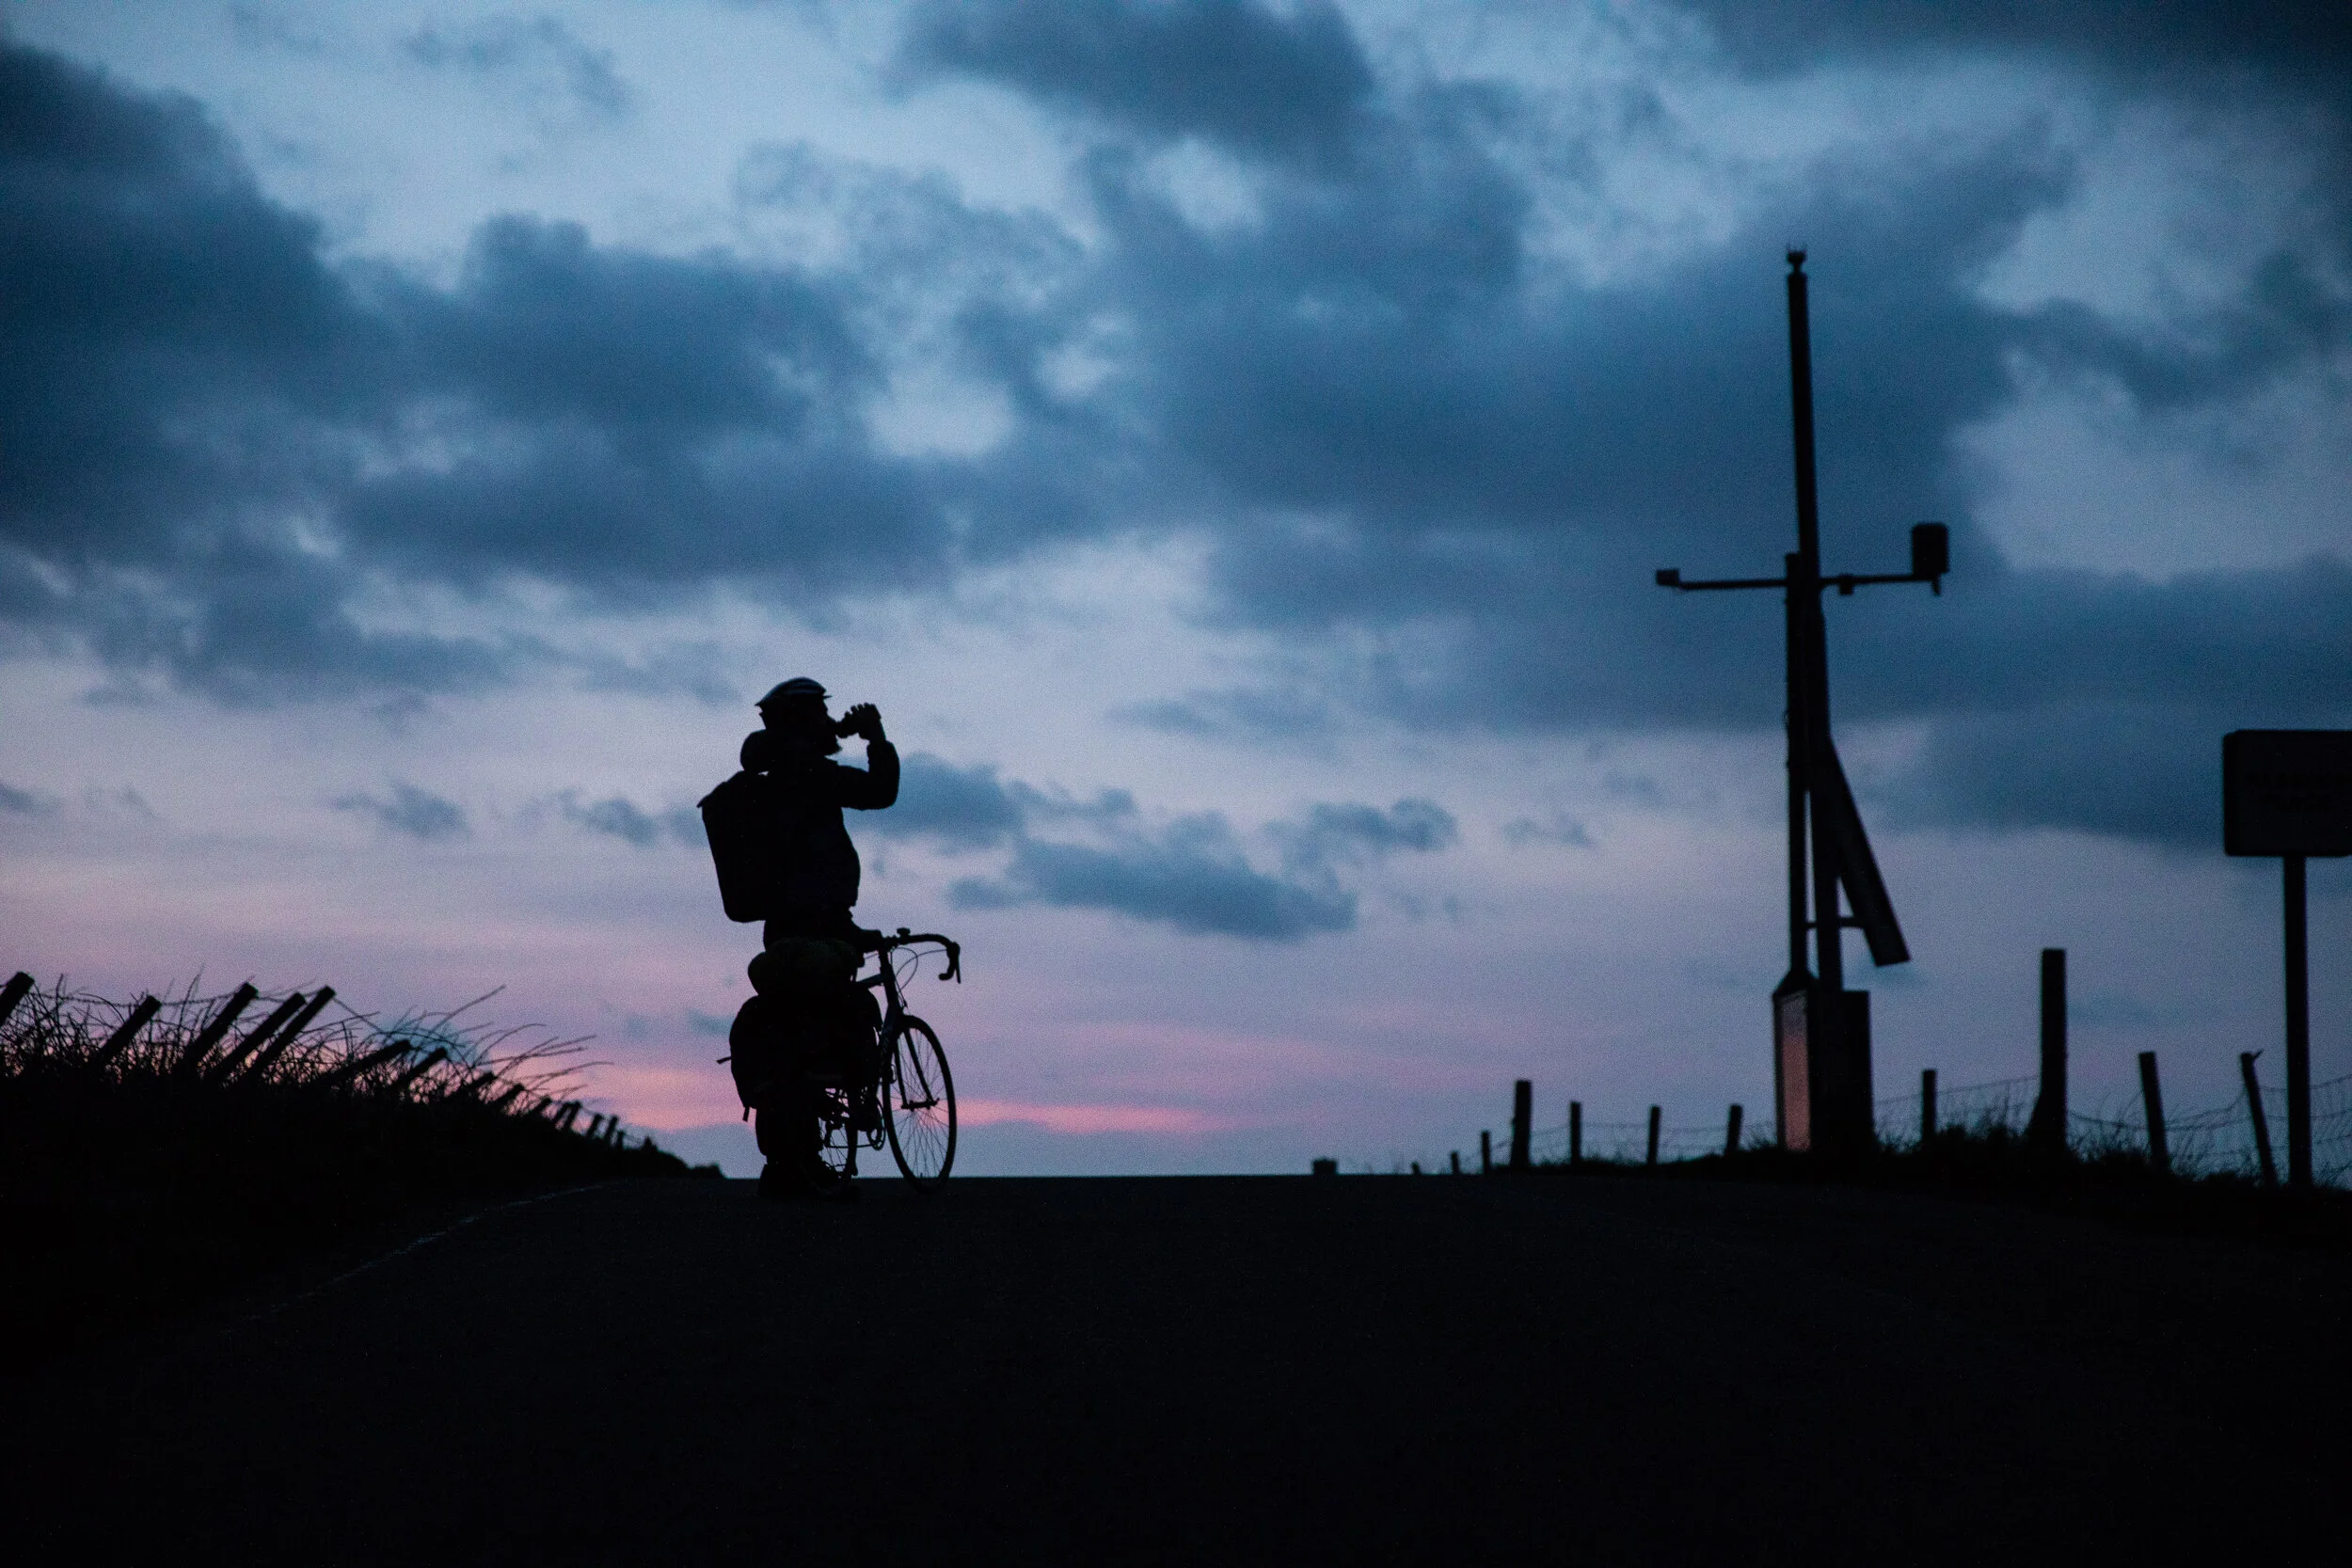
“Travelling” for many conjures up the idea of around-the-world tickets; distant raw mountainscapes and idyllic sandy beaches in far foreign lands. Though few may argue it is a state of mind; it’s adventure; it's moving day to day with your luggage on your back...or bike; it’s not quite knowing where you will rest your head that night, or battling mind and body to reach that flight.


Taking the Caledonian Sleeper train from Euston to Glasgow late one Thursday night, and a connecting train from there to Oban the following morning we had now arrived at the start of our adventure through the Outer Hebrides. The Ferry departed Oban at 3pm and arrived around 6.30pm to Castlebay, on the most southern island of the Outer Hebrides; Barra. We took a short cycle, and found a nice spot to camp for the evening; sheltered from the wind, on the lock-side; we set up a campfire, cooked dinner and made ourselves an early night.


Morning came; the sun was out, but winds were racing at 45mph in a northeasterly direction due to a cyclone far out in the Atlantic, not far from Iceland. This led onto us being stranded on the island as ferries were unable to operate for the next 48 hours, but we made the most of it and explored all of the island.
On the Monday morning we finally were able to catch a Ferry at 7am - winds were still strong but not as bad as it had been - a beautiful morning to be cycling with pinks and purples lining the sky, and the sun rising as we departed for Uist.


Due to the delays we were well behind where we had planned to be, and we knew of a Ferry departing the north of Uist (Berneray) to Lewis (Leverburgh) at 5pm roughly 60 miles away that we wanted to make. Uist comparatively to the other islands is fairly flat; some beautiful beaches in the south, a quiet single track road the majority of the cycle, and some amazing causeways making it very scenic and a good cycle. That said we certainly had to work hard to meet the ferry deadline due to a pannier rack breaking on an uphill climb; having to fix it in a roadside mechanics really ate into time deadline...still we made the Ferry.


On arriving in Leverburgh, winds were still fairly strong, we were all pretty shattered, and one of us had a flat so we stayed in a hostel, which we had to ourselves, picked up some fish and chips from the only restaurant in the village and had an early night.


Tuesday morning we were greeted by rain for the first hour or so of the cycle and again later in the day. Lewis and Harris are really the highlights of the Outer Hebrides, meaning the day was a real treat despite the weather. As we hugged the coast line around the northeasterly side we cycled along a golden coastline, and we took a short detour to Luskentyre beach; the best of the lot; white sands, grassy dunes, turquoise waters, and a couple of white wild horses to top it off.


After a lunch stop in Tarbert, we cycled north again; beginning along the coast and then cutting in through the mountains, climbing up to pass...the toughest part of the whole ride. During the afternoon we had to put up with some hard rain and less exciting landscapes, finally arriving in Stornoway at 5pm, where we caught the ferry back to the mainland the next day.


Unfortunately due to the ferry delays earlier on in the trip we were unable to see more of Harris, leaving a real hunger for a return. If you are reading this and planning a trip a few other places we planned for but were unable to reach include; The Stone Circle, Mangersta (and the sea stacks), Gearrannan Blackhouse Village and the Butt of Lewis. I’d also recommend planning a few more days to allow for ferry delays as we found out that it does happen quite often.

In recent years I have grown to love the landscapes of the United Kingdom; Scotland in particular. The delays changed our course for the trip and diverted away from the plan, but it is these unforeseen antics that add to adventure, and make the experience seem real. We disconnected from our lives back home, worked as a team, supported each other, and witnessed beautiful untouched landscapes that not many go to; raw mountainscapes and idyllic sandy beaches...it goes to show you don’t need to jump on a plane and travel around the world to experience an adventure or “travelling”.
The Godfathers of Photography
In a world where Instagram rules and is the go-to for inspiration for many photographers and creatives alike, I think it is important to recognise and admire the roots of the photography art form. The people who inspired your favourite photographers, the people who built the art form and really pushed its limits with far fewer resources than we have today.
Here are a list of photographers who have inspired me, whose work baffles me, I find timeless, and I can continually go back and to admire and inspire me. These are the godfathers of our craft, and while many don’t have instagram accounts, the images you see from the super talented photographers of today will derive from inspiration from these guy’s work.
This is merely an introduction to these Photographers, I urge you to research further into who they were, and their work. I will link as much as possible to other websites with interesting content about them and photography
Henri Cartier-Bresson - The Godfather of Street Photography

A French Photographer who really made a name for himself in the mid-20th century for his intimate candid street photography and creative compositions. He is probably best known for this work and consitantly running theme throughout all of his images “The Decisive Moment”.
“If you seize a fleeting moment when form, line, light and content are arranged perfectly within the frame, then a single picture becomes a story in itself” - Henri Cartier-Bresson
His journey as an artist routes from fine art where he initially started out his creative career as a surrealism artist, it was during this process of development as an artist he picked up a camera and started to shoot photographs with a surrealism essence. This was very unique for the time, and he was pretty much the only person doing it other than Man Ray (also worth while looking up!)
He later enrolled with the French Army in World War II, and moved away from Fine Art and more into Street and Documentary Photography. It was then he co-founded Magnum Photos (the most prestigious photojournalism agency in the world) with a few others, and went on to document key moments in history such as the Coronation of King George VI, Ghandi’s Funeral, the Queen’s Jubilee, the Chinese Civil War.
He is considered the Photographer’s Photographer. Every photographer knows and loves his work. His approach and ability to create thought provoking images within a split moment that are timeless with relevance, or an insight into that time period or person’s life.
To see more of his work, and read up more on him, please see: https://www.magnumphotos.com/photographer/henri-cartier-bresson/


Martin Parr - The Godfather of Documentary & Ironic/Humorous Photography

This man must have a great sense of humour, and it really shows in his work. His style is so unique with the bright, garish in-your-face colours. Most notably known for his ability to document British Culture, Leisure and Tourism in a way that it really evokes an emotion where he challenges what us Brits see and know as the norm.
He does this through using intriguing ‘close-up’ compositions and bright, intense colours to demonstrate the oddity of what we consider normal life and culture. His work is not beautiful in visual sense, but in a metaphorical sense (to me anyway!)…quite grotesque and repulsive which really gives it a unique charm.
Martin also joined Magnum Photo Agency in 1988, his style was very unlike any of the other photographers in Magnum, and was to some degree heavily contested as to whether it was worthy of Magnum. His style, I like to think is fairly fitting of Marmite, another great symbol of British Culture; you either Love it of Hate it!
To see more of his work, and read up more on him, please see: https://www.magnumphotos.com/photographer/martin-parr/


Steve McCurry - The Godfather of Travel Photography

Probably the most influential for myself, I love all of Steve’s work, his photos just continue to amaze me, I always feel like I can’t have enough of it and I find it motivates me to do better; to experience more and to try and document in a fresh way. I have a couple of his photobooks in my lounge, and when I’m going through a moment or time where I am struggling with my creativity I just open them up and can spend hours studying the photos.
Photography in his early years took him to India where throughout his whole career he has continued to return to photograph and document a feeling, desire and connection I too hold close to my heart.
His career really kicked off when smuggled across the border into Afghanistan in the early 80s to document the Soviet Afghan War focussing on the toll war takes on the people. This work led to him taking the “Afghan Girl” portrait, probably one of the most re-printed images in the world and National Geographic cover image.
Yet another Magnum Photographer; view more of his work and back story here: https://www.magnumphotos.com/photographer/steve-mccurry/


Ansel Adams - The Godfather of Landscape Photography

This guy is the original #vanlifer he is best known for photographing great dramatic landscapes Yosemite National Park, but his work spread a lot wider and further than that. Aged 12 on a family holiday to Yosemite his dad brought with them a camera and he took his first photo, he was hooked after that. Throughout his late teens he shadowed other photographers in San Fransisco around the Bay area and as and when he could would make trips back to Yosemite; this work led to his first image being printed.
He predominantly used black and white photography over colour as he preferred the editing process and the boldness and contrast of BNW prints. How it made him and others feel when experiencing the image; the sight of these huge expansive, overpowering and dramatic landscapes.
For me his composition is flawless and leads the viewers eyes around the image, focusing on different aspects of the image, as well as appreciating it all as as a whole.
To see more of Andel’s work and find out a little bit more about him, please see: https://shop.anseladams.com/collections/original-photographs-by-ansel-adams


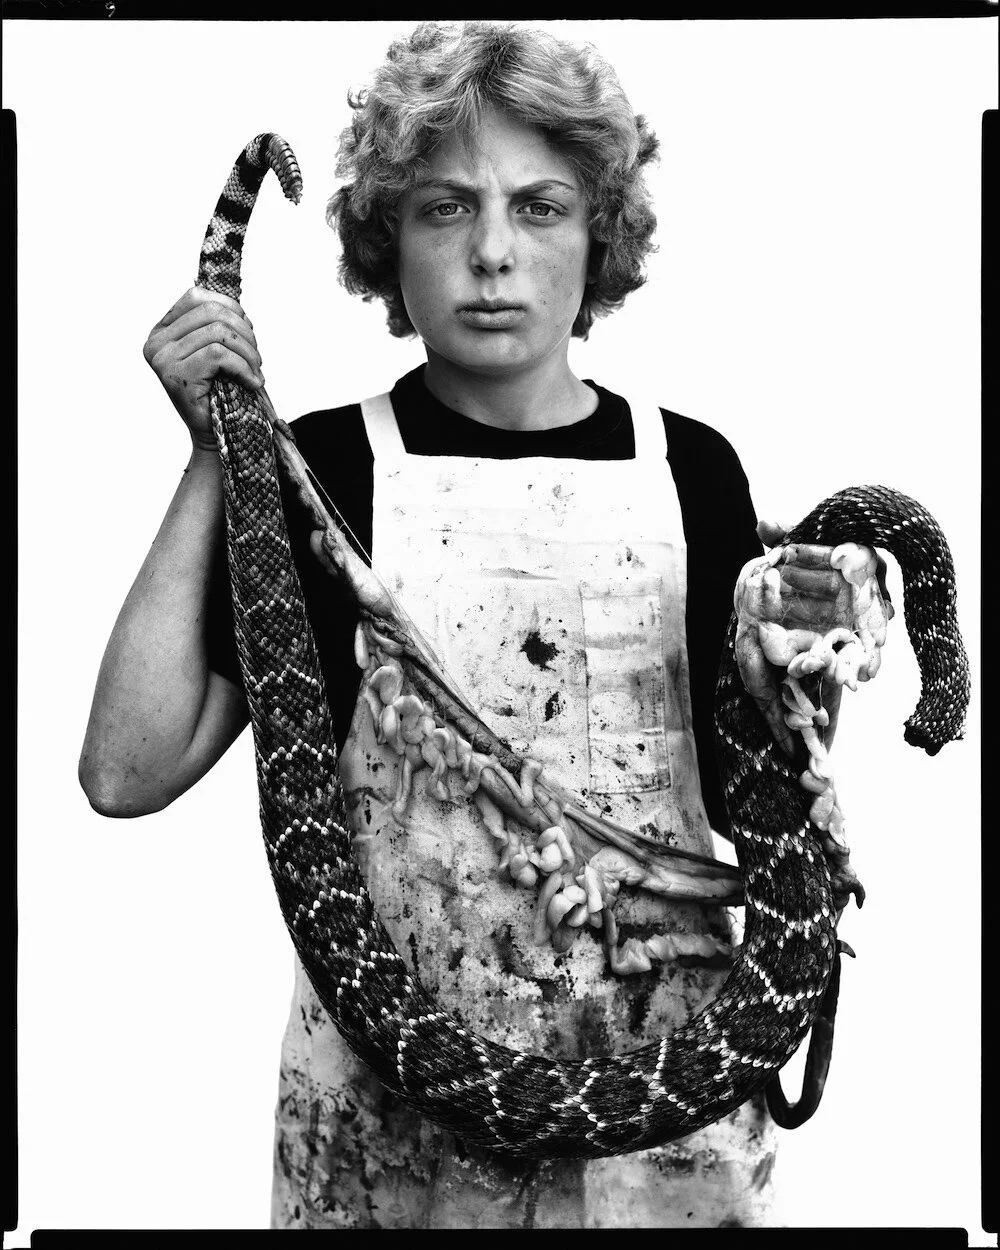
Richard Avedon - The Godfather of Fashion / Portrait Photography

This man wrote the book for fashion photography; he took what everyone thought was the norm for portrait photography and turned it upside down. Portrait photographers up until Avedon would work with their subjects to really showcase that person to the best of their abilities, where as Avedon would accentuate and celebrate that persons flaws and imperfections. His studio would become a theatrical performance, he being the director, allowing for madness to unravel in front of his camera, pushing people to their limits, introducing motion and dance into many shoots.
“The key to Avedon’s art is not in his technical devices which he invents and disregards with restless rapidity but it in his preoccupation with the looks, mannerisms and gestures of human beings” - Winthrop Sargeant, The New Yorker
He started out as enrolling in the US Army in World War II, documenting life as a soldier, he never pushed for a career into photography just fell into it through this. On his return to New York City he photographed on street and was hired by a department store to take images, and he was soon snapped up by Harper’s Bazaar Magazine as their in-house photographer, and later Vogue Magazine.
Later on in his career he moved further away fashion, to focus on people with great accomplishment; sportsmen and women, actors, politicians and activists. He went on to photograph the Vietnamese War, the American Civil Rights movement, and (my favourite) the documentary series of portraits that took him 5 years of farmers, miners, truckers and factory workers the ‘Mid-American West’. He worked right up to the day he died in 2004.
Over his career he photographed The Beetles, Marilyn Monroe, Bob Dylan, Audrey Hepburn, David Bowie, Muhammed Ali, John F Kennedy, Malcolm X and many others.
You can find out more about him and his work at: www.avedonfoundation.org


Don McCullin - The Godfather of War Photography

Disclaimer: This may be a controversial choice as many will say (including Don I’d imagine) Robert Capa was the God Father of War Photography; also co-founded Magnum Photo Agency with Henri Cartier-Bresson but I’ve chosen Don McCullin as I connect with his images more, and find him to be more of an inspiration to me.
Don, another Brit Photographer, now knighted for his lifetime efforts documenting some of histories darkest conflicts. Some of his most notable work coming from the Vietnamese War, the regime in Cambodia, the conflict in Biafra and the Congo.
He aims to convey complete honesty in his images, showing the rawness of war and how it affects the people, not only the soldiers involved but the civilians caught up in it all. His images are impactful and really communicate with audience the extent of what is happening.
He grew up in East London, in neighbourhood heavily shelled by the German’s and as a late teen joined the RAF as part of his national service. It was during this time he started experimenting with photography, then returning to London he would start photographing the local streets and people of the area, including a local gang that he then sold the image to the Observer Newspaper. This kickstarted his career in photojournalism.
For more on Don and to see more of his work, please see: www.donmccullin.com
There is also an incredible documentary called ‘McCullin’ I would HIGHLY recommend, it used to be on Netflix, but I think they’ve taken it down now, however I would highly recommend hunting it down!


Sebastião Salgado - The Godfather of Fine Art Photojournalism

Many debate whether Sebastião Salgado’s work is photojournalism or fine art; typically photojournalism should be a real representation of what has happened; a truth, not tweaked or edited in post production and never to pose the subjects in the photographs. While Sebastião’s work educates the audience of real life events, he works the images in post production to add drama and some say he has altered the reality so therefore to some degree the images stray from the truth. To me, he introduces his own emotions and experience of witnessing such traumatic experiences to add a fourth dimension of drama.
Brazilian born, started out as an Economist, during business trips to Africa he started taking photos, and soon spiralled into obsession with photographing African life, tribes, and nature. Another Magnum Photos photographer, he worked on assignments across the globe but always with a particular interest in Africa, usually working within areas of conflict or famine, and later in life partnered with Unicef as a ‘Goodwill Ambassador’. I would highly recommend two of his photobooks ‘Africa’ and ‘Genesis’, both are phenomenal! There is also a biographical documentary movie about Sebastião I can also highly recommend ‘Salt of the Earth’ directed by Wim Wenders.
To view more of his work see: https://www.ecosia.org/images?q=sebastiao+salgado+photo


Hopefully this offers you a small insight into the history of photography, and the people who helped innovate and change the game way instagram and way before DSLRs were even a thing!

3 Weeks in & around Myanmar
Back in 2010 I had a 6 month trip through Asia; India, Vietnam, Cambodia, Laos, Thailand and Malaysia. Money was tight, and the Myanmar border crossing even tighter, so didn’t include in that itinerary. Still, on returning, I bought a travel book, and over the years researched the country further. Life and other destinations got in the way, so it took 8 years to get back to Asia to visit the country.
For me, this trip was always going to be focused around the people who make Myanmar. Yes, they have white-sand exotic beaches, ancient temples, thick jungles, and mountains topped by pagodas, but for me; it’s the people; who make the experience.
The country opened its doors to tourism in 2010, and still today, in comparison to bordering countries receives very few foreigners. This leaves the country innocent from tourism, and western influence, they are proud of their heritage and culture with 135 registered ethnic groups.

When previously taking travel portraits on other trips, I found the experience very one sided; I would talk and communicate with people and ask to take their photo, but I was always very aware that they would get nothing really out of it, other than a bit of chat from myself. I wanted to change this, I wanted a way to give back something to those I met and photographed along the trip.
After doing a little bit of research online I found a hybrid Instant and Digital Camera; the Instax SQ10 - you take a shot, view the photo on the digital screen on the back of the camera, you can print the image but also save it to print at a later date, or multiple times. One can also put a filter on the shot, which immediately gives so many options - instead of buying a variety of films with different effects, its all in camera!
This trip had two purposes; I wanted to see and experience the sights; meeting locals as I traveled around, but I had also found out about a community in North Western Myanmar, in Chin State where the elder women within the tribal communities had tattooed faces. I wanted to explore this further, I wanted to find out more about the culture and tradition. I was already aware that younger generations were no longer doing this, and wanted to meet and document this community/tradition as it was my belief that this element of their culture in the not too distant future would die out.
The Trip:
I started the trip in Ngapali, a beach town on the Western coast of Myanmar. A white-sand beach, decorated with palm trees, and old, rustic fishing boats, and vivid turquoise water, where every night night the sun sets into the ocean. I arrived on April 14th - which happened to be Day 2 of Thingyan, the Myanmar New Year, the busiest time of their annual calendar, and still the beach was quiet. There was a fair amount of local tourism but only a handful of other Westerners to be seen. My four days in Ngapali resulted in minor sunburn, lots of reading, lots of relaxing, sunsets every day, and exploring the neighbouring fishing villages.

A short plane ride and a 3 hour bus ride later I arrive in Mrauk U, a small town home to a series of temples and Pagodas that was the capital for an independent Artakan Kingdom from 1430- 1785. Because of its remoteness and how difficult it is to reach there, very little tourism reaches there, especially in the low season which was when I was there. I spent a couple of days exploring these untouched temple ruins, still in very good condition.

In the local area to Mrauk U, it is possible to make your way to a series of Chin Villages along a river - none of these villages have road access, so we hired a boat and a guide, and took off 1.5 hours up the river with the aim of staying in one of the villages. Chin state is made up of 8 prime ethnic groups, but over the years these 8 groups, have been split further, so now they estimate there are 49 ethnic groups within Chin State, of which they would make up around 300 villages and small towns. This area is nearly all off grid, there are very few roads, and the population live off the land - local farming, foraging, hunting, etc… Each village will be home to a tribe, each tribe have their own traditional dress for men and women (though only in some areas do they still wear it on a daily basis). Depending on the village they will be either Aminist, Christian or Buddhist. Up until around 1930 all of the tribes in Chin were Aminist, at which point Buddhist and Christian missionaries came into the area and converted the majority.

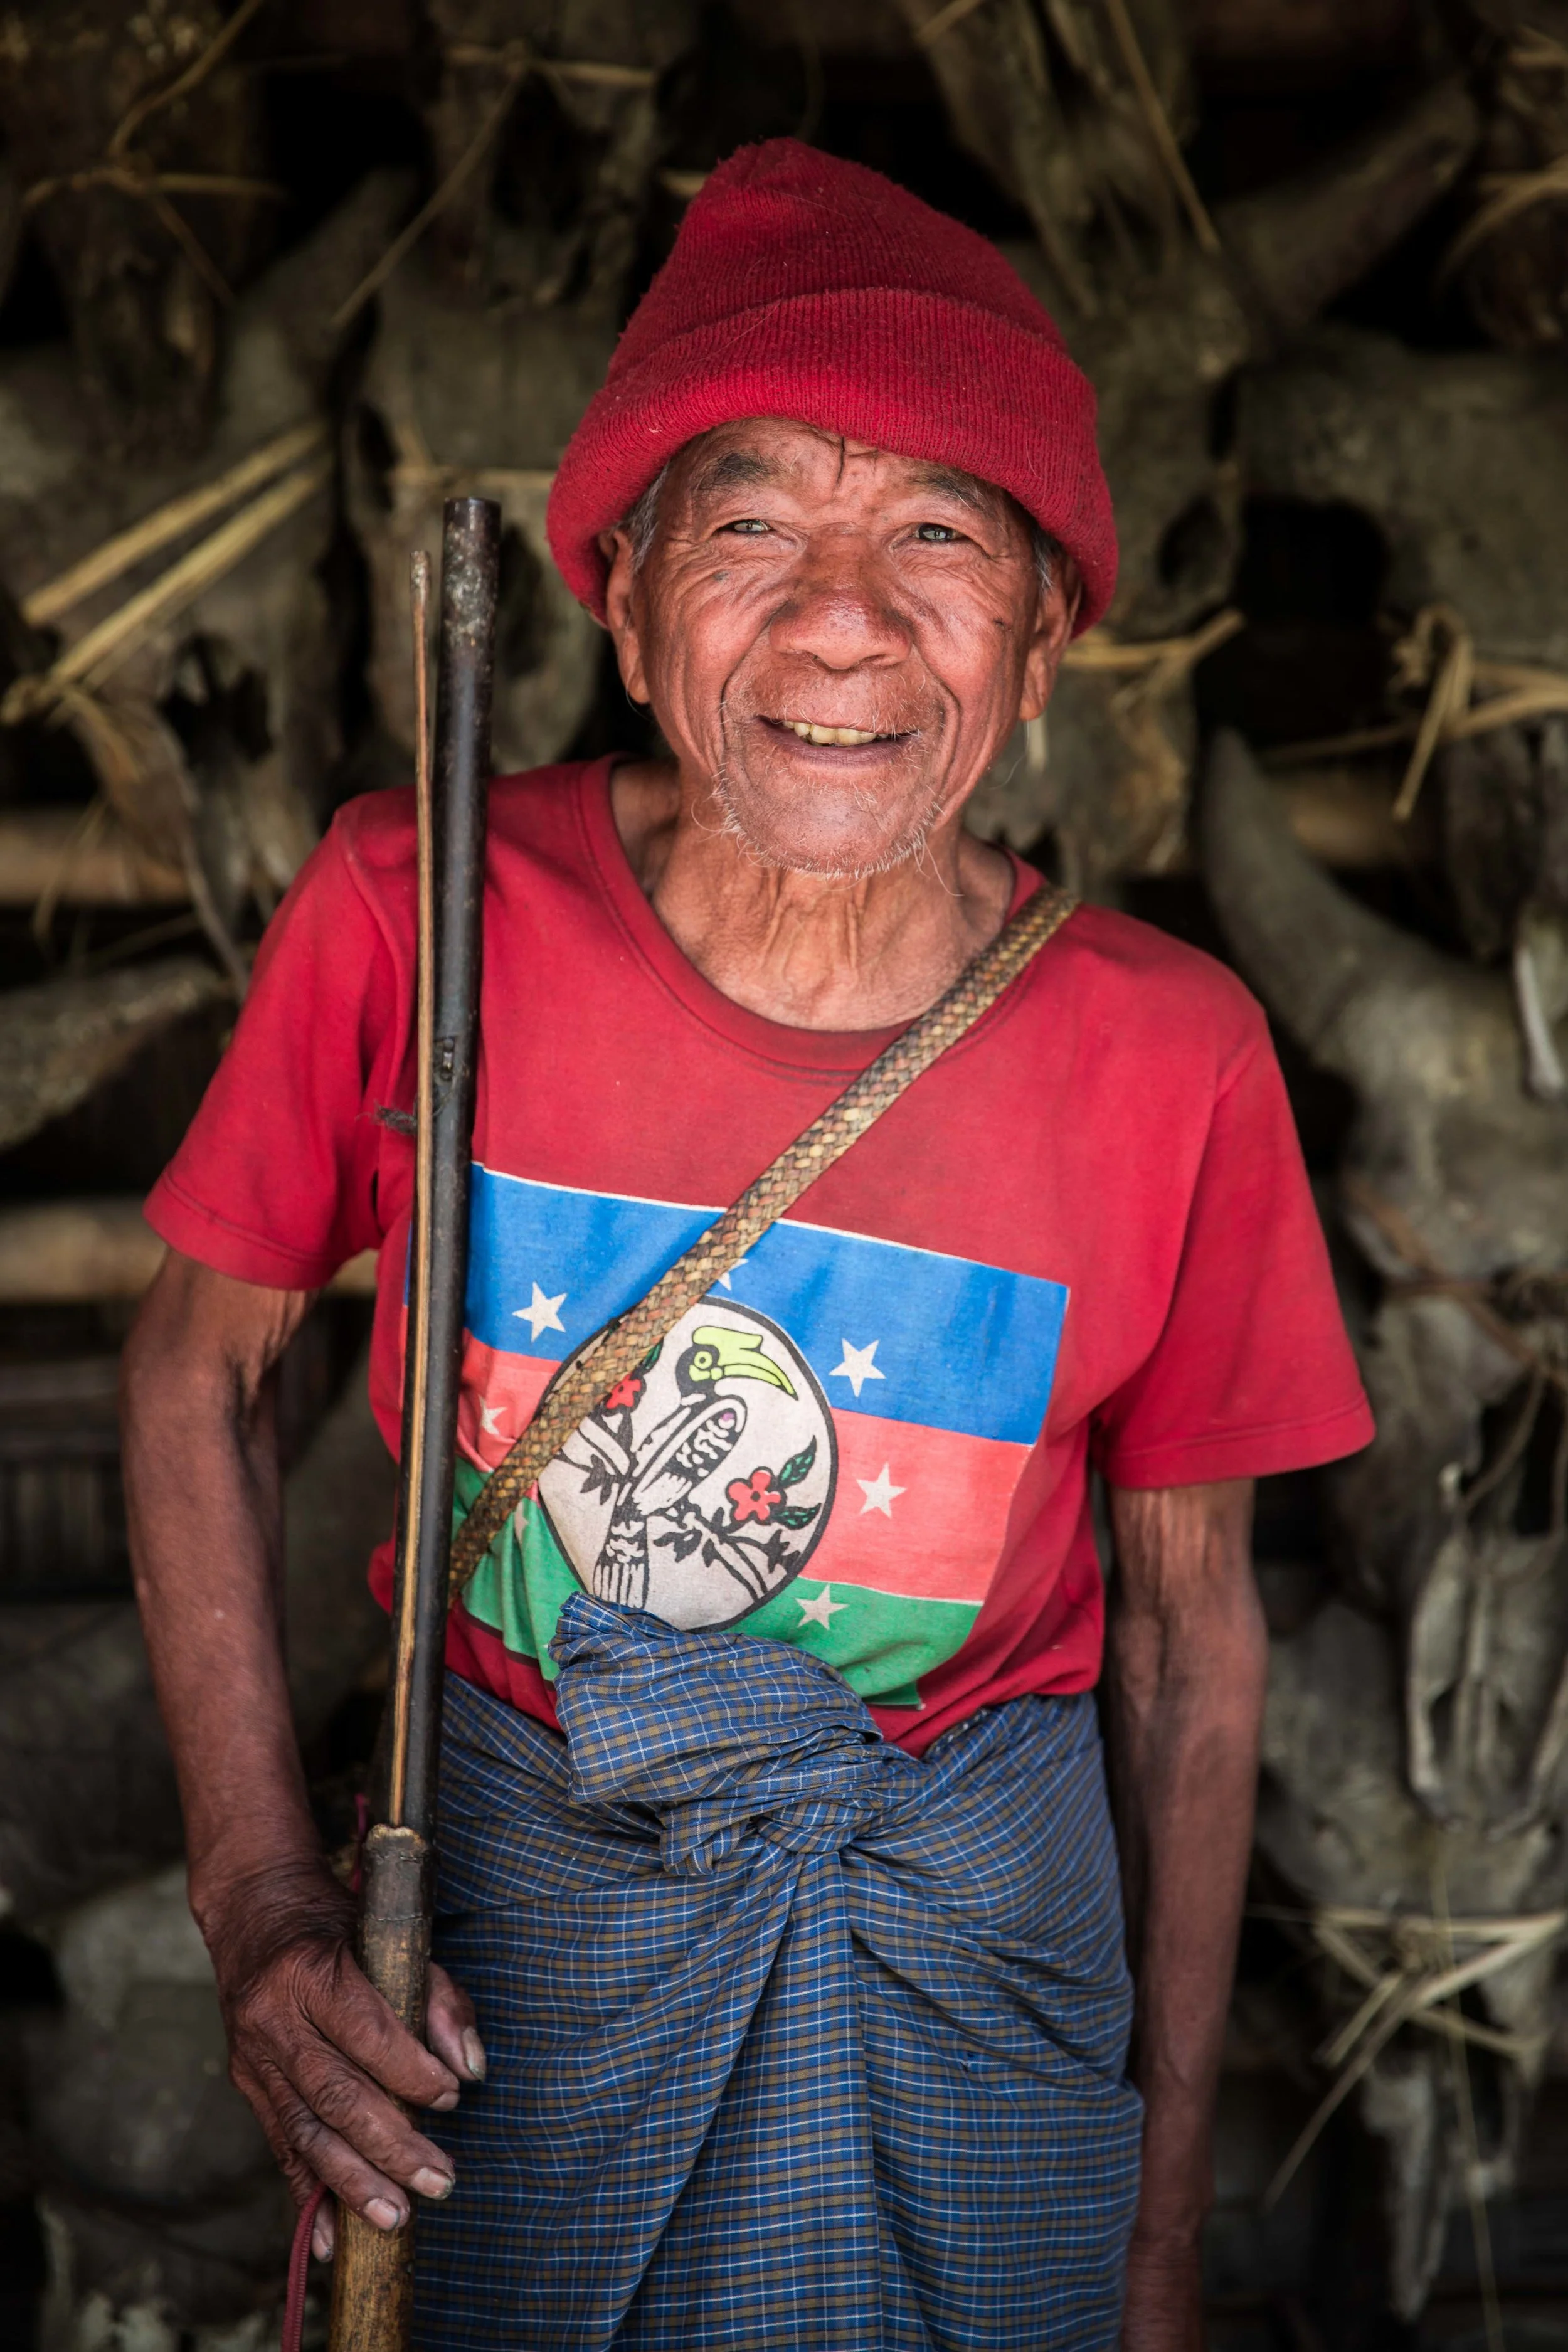
Each ethnic group, as well as their own traditional dress, would have their own style of tattoo which was compulsory for all of the women of each tribe (unless allergic). One women recited her memory of being 9 years old and terrified when having hers. Though in most instances the women are very proud of their tattoos and culture. In 1962 the Military Government came into power and made this element of their culture illegal, I later found out that the very few wealthy families would still get their tattoos as they could afford to pay off the government officials.
These villages I visited were all from the Lai Chin tribe, of which their facial tattoos are distinct, and are described locally as ‘spider’s web tattoo’. All of these three women below had nice little Instax momento’s to put up on their walls :)


Next stop on my Myanmar adventure was one of the countries biggest tourist attractions; Bagan - 2000+ temples dotted over around 100 square KMs, some of which are over 1000 years old. Without too many rules and regulations you can explore these temples. They are set on vast plains, so with a good vantage point one can see green lush bushes with temples peaking out for as far as the eye can see. It's a truly magical place!


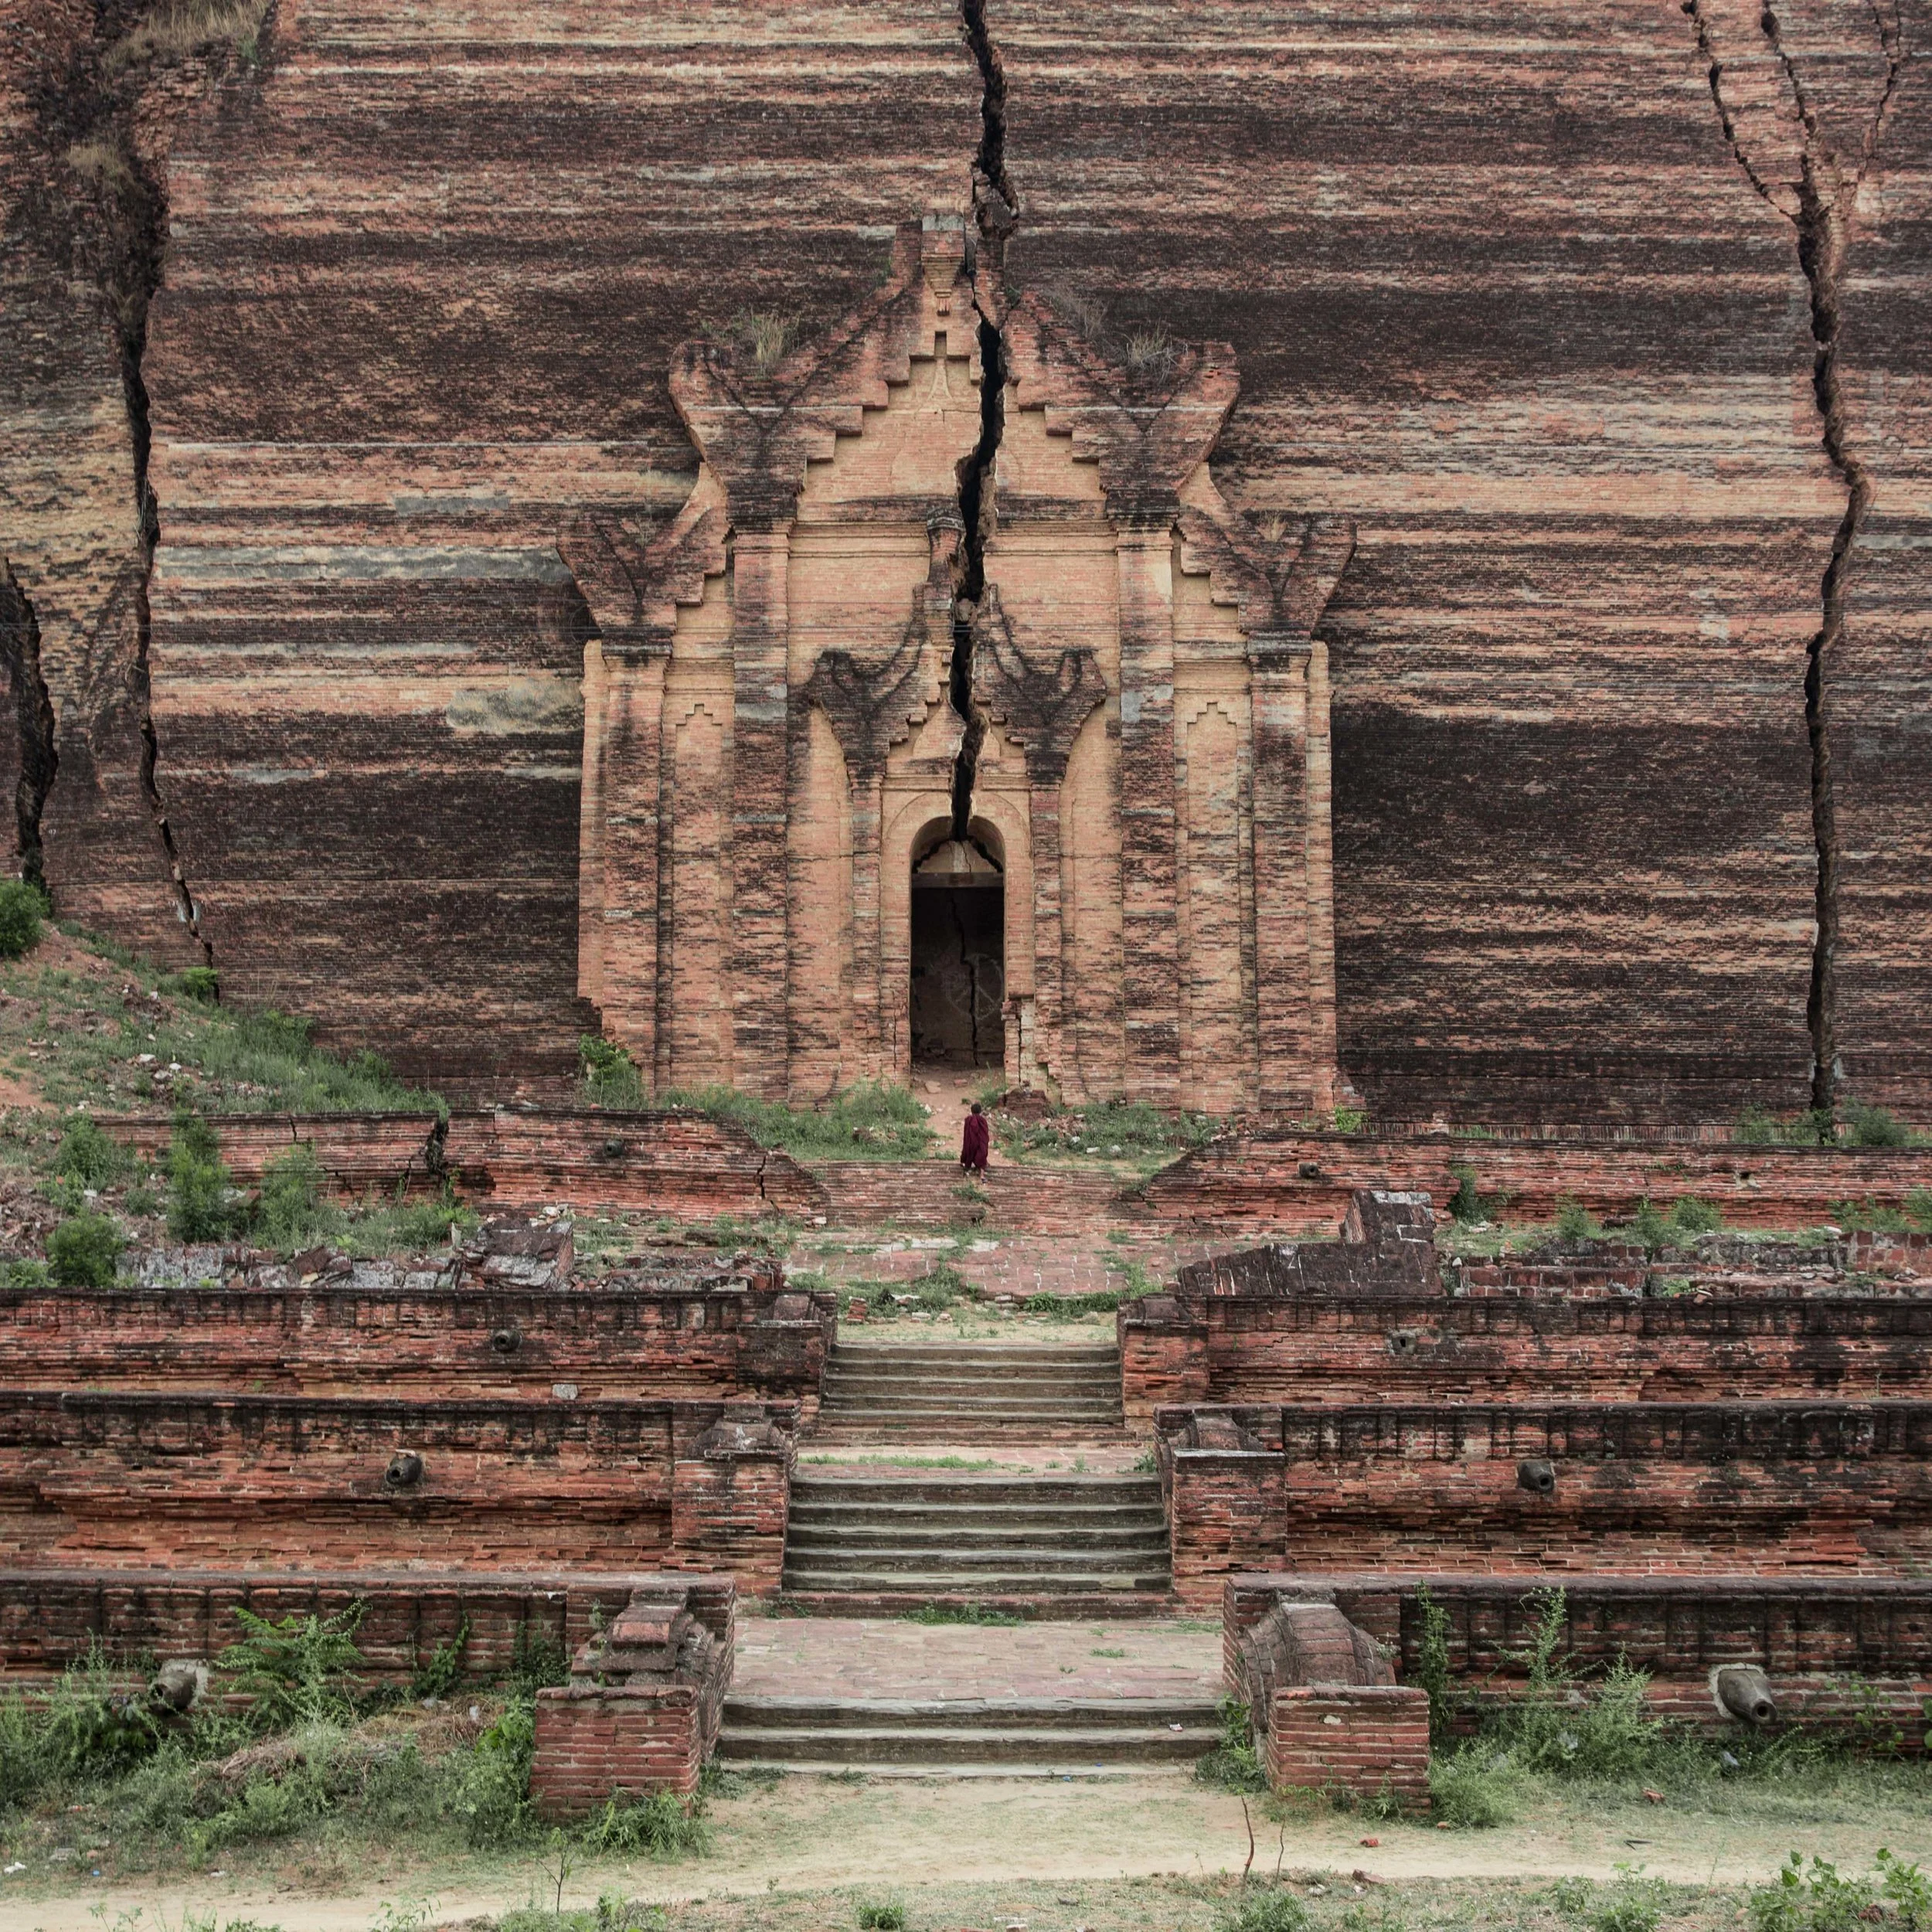
After 2 days in Bagan, I left for Mandalay, the 2nd largest city in Myanmar. Usually I avoid large cities in foreign countries; but there was a place I had set my eye on to visit; Mingun Pagoda. About 10-15 years ago I found an image that I fell in love with, it had no details of where it was or who it was by, later I would find out it was taken by Steve McCurry - one of my favourite photographers and big inspirations, and taken at the Mingun Pagoda in Myanmar. A young Monk helped me create some images I am super happy with and as a little thank you I used the Instax to take his portrait and create a similar photo for him to keep.


A couple of days in Mandalay was enough city for me, so I took an 8 hour overnight bus south to Kalaw, arriving in the early hours. Kalaw is situated around 1300m above sealevel - it’s a chilled hilltop town, very rural, within 30 mins walk you’re thick in farmland. I met my friend; Dan, and joined a small group of others with the aim of trekking from Kalaw to Inle Lake, it would be 3 long days, with 2 nights sleeping in homestays in the villages enroute.
Walking through these small villages who predominantly farm tea, I met this family, the grandfather sat outside smoking his cigar, we made eye contact and smiled, I greeted him with “Minglabar” (Hello), and he returned the gesture. I took his portrait and passed it to him, and together we watched as the film developed in front of our eyes. I could tell he was amazed by what he was witnessing. He passed it through a window to his wife, daughter and grandson who also reviewed, and found it all most amusing!


Later on that day we walked along a railway until we reached a small village where the locals had picked fruits, vegetables and flowers to sell to the oncoming train, most days between 2 and 3 trains pass through. The buzz created as the sellers ran between the different windows trying sell their goods to the passengers felt so intense at the time, knowing that these few minutes before the train departed was all they had to make their daily wage.


That night we stayed in a families house in a small village, and were up bright and early trekking by 7am the following day to get going before the heat of the sun became to strong. At some point during the day, I met a farmer and his son walking through some fields. He showed us a river with a bridge that we could jump off (unfortunately due to the sheer excitement I didn’t get round to taking any shots of that!).

A day later we arrived at Inle Lake; home to a fishing community with a unique style of fishing where they balance on the end of their boats while balancing a basket in their air between their arm and their leg, throwing it down into the lake capturing the fish and scaring them to swim into the net which then becomes loose so get tangled within it. I first saw images of these fishermen about 10 years ago, and since it had always been something that I really wanted to witness myself and photograph.


I spent 24 hours in the Inle Lake area, which was enough for me. I had less than a week left to my flight back home, and so far the highlight had been venturing into Chin State, so I decided to make my way back to Chin state but to a different area to learn more about another tribe within Chin. I took a couple of busses (18 hours of travel) to Mindat, where I made arrangements to visit 3 villages the following day; all from the Mon Chin Tribe, and I was also told there was a woman in Mindat who was from the Dai Chin Tribe (last in the series below).


This pretty much takes me up to the end of my Myanmar experience. For me, the people make this country; their friendly attitude, helpfulness, warming nature and curiosity was stronger than anywhere else I have visited. The rich culture throughout the country amazed me particularly within the Chin communities. I'd love to return to focus all my time in documenting the people of Chin; as I mentioned previously there are 49 sub-tribes of which root from 8 core tribes - I'd love more time to explore and document all of them...maybe a trip for early 2019!
A winter adventure to the Lake District in a Land Rover Defender Campervan
In 2017 I went about exploring more of the UK, and finished the year off by venturing up to the Lake District with a friend in one of Quirky Campers home-on-wheels. We picked up “George” an ex-army ambulance converted into a camper from Bernie and Sarah in Norwich and set off on a long drive to the North!
On arrival late that evening on the shores of Windermere, snowflakes started to settle, it became very cold, we parked up, cooked up some pasta, drank some tea and nestled up in our sleeping bags. When we woke the next morning, peeking through George’s curtains we could see nothing but snow everywhere, it was cold, but how often do you get to see this much snow in England, and how often do you get to drive around in a Land Rover Defender Campervan - we were certainly well equipped for the weather!


After a coffee, some breakfast and blowing steam (smoke) rings with our breath we were ready to go off for a walk to explore the Windermere lakeside.

Back in George, with snow covered roads I wanted to take him to his natural habitat so headed for the the mountains; specifically the Great Langdale valley. We drove around the tight roads, regularly stopping to take in the landscapes and to allow sheep to cross the road.


We took that road and drove round and a long way up to the Wrynose pass where only we and another couple 4x4s ventured. George was built for these conditions, and at this time, we were very grateful to have him, as I am sure other campervans and even cars could not have made this journey. Because of his weight, 4x4, and thick tyre tread he was perfect!


That night we stayed in a small town called Coniston, also on the side of a lake, here we cooked up a curry, and found a nice local pub for a few beers and to dry off/warm up.
The next day we headed for Buttermere lake via the Honiston pass, unfortunately all the snow by this time had melted which made it a lot easier to drive. We headed North towards

When we arrived in Buttermere we had a short walk then stopped off at the pub for a couple of drinks before cooking up a pasta dinner and playing cards and Jenga.

In the morning (of New Years Eve) we went for a long walk around Buttermere lake, exploring the area further, it was quiet, we only saw a handful of other hikers. Buttermere is a really special place which I plan to go back to for a week or longer just to stay there and hike - the lake in the Valley and pretty much in all directions hugging the lake are beautiful large dramatic looking mountains with stunning waterfalls.

When we got back to George we took him up along another pass headed towards Keswick, pulling into explore the Moss Force Waterfall at the top. Here you could see back towards Buttermere in one direction, and along another valley towards Keswick in the other. No man made structures stand in your eyeline, just mountains, rivers, rocks, grassland and a road.

New Years Eve we spent in Keswick - the largest town in the Lakes, a really nice quaint town, full of climbing shops, pubs, fish and chip restaurants and independent shops, again also on the side of a lake which offers great walks which we did on New Years day, but not before a good new years bacon sarnie!

A Road Trip around the Isle of Skye in a Land Rover Defender
For years I’ve known of the Isle of Skye, it’s been on my bucket list for a very long time, and I can assure you it measured up to expectations. The island, accessible by a magnificent bridge has dramatic, isolated, raw landscape. Cliffs that sheer from hundreds of meters down into the ocean, sharp jagged peaks that pierce the skyline, and thick vivid green and purple shrubs that hug the barren terrain.

I teamed up with Aberdeen 4x4 on a project, taking one of their Land Rover Defenders across the country, via the Cairngorms, and stopping off at the Glenfinnan Viaduct, then up and around the Isle of Skye, then back across the country via Inverness to Aberdeen. The trip has left me with a hunger to return to Scotland, and to Skye!
Day 1: Sunday (Aberdeen - Braemar)
After arriving at Aberdeen airport late afternoon, picking up the Land Rover Defender and having a stop at the supermarket to pick up the week’s supplies, we headed west to the Cairngorms along the A93. During some research before the trip I had read that throughout Scotland were a lot of old Military roads, also referred to as ‘General Wade’s Military Roads’ and the A93 had at one point been one of these. We headed towards Braemar, a small town in the heart of the Cairngorms where we stayed at Braemar Caravan Park, unpacked, erected our tent, and had a nice Haggis and Beef Burger in the Invercauld Arms and went to bed in our little tent!

Day 2: Monday (Braemar - Glenfinnal - Skye)
We woke and left early heading south, back on the A93 through the Cairngorms, stopping at the edge of the National Park for a coffee and some breakfast. The landscapes in the part of Scotland are an attraction in their own right, so just driving and stopping every now and then is a lot of fun, and even more fun with a well put together roadtrip playlist!
We were aiming for Fort William where we needed to buy some camping supplies, and then on the Glenfinnan Viaduct. This viaduct sets the scene for an almost Hogwarts Express steam train running through the Scottish Valleys. I had done my research and found out that two afternoon trains were due one around 3.00pm and another about 3.20pm in either direction, meaning we needed to find a good spot, and set up lunch - spicy Korean noodles boiled on a small gas camping stove.
The lighting was just perfect to capture and light up the steam train as it ran across the viaduct between the two mountains.

After finishing our noodles we headed back to the car. We were supposed to drive on to Mallaig (about 45 mins from the viaduct, west) to catch a ferry (£15) to Skye, however due to strong winds the Ferry unfortunately was cancelled, meaning we had to drive back to Fort William and north towards Isle of Skye.
While this was not planned, this part of our road trip turned out to be one of the most stunning; we counted 4 rainbows as we drove the car round 5 Lochs (Loch Lochy, Loch Garry, Loch Loyne, Loch Cluanie, and Loch Duich). Every corner resulted in us in awe; shouting in excitement at each other at the sheer beauty and vastness of the landscapes we were seeing in front of our very eyes.
I had originally planned on the way back to stop at Eilean Donan Castle a 13th Century Castle set slightly into the Loch so surrounded by water in three directions. However, as we were passing now and the sun was starting to set, it was looking incredible so took some time away from the driving wheel to chill and enjoy the view.

Back in the seat again and we were heading across the Skye Bridge, which takes you up to a great height enabling you to see all the surrounding islands in the distance and the weather at the time was fairly clear.
On arriving in Skye we needed to find a spot to wild camp, I thought I knew of a place down towards Elgol, so we headed in that direction but were warned that in the area the cattle walk freely so there have been incidents where campers tents have been trampled. So after reaching Elgol, we headed back along the road we had come just past Kilbride where we took a small single track road down about 2km to bay where it opened up and was grassy patch where we could camp. By this time it was pretty much dark, so needed the assistance of the car’s lights to put up tent, and soon after we went to sleep.

Day 3: Tuesday (Kilbride - Dunvegan)
In the morning when we woke, we found a sunny day, surrounded by sheep, lovely still water across the bay so made breakfast and coffee and sat and enjoyed the views. After we went for a walk around the area and stumbled upon the farmer’s house who invited us in for tea and biscuits and proceeded to tell us about his livestock, life and the history of the area. I found this super refreshing, to have a complete stranger offer such generosity (especially when he knew we had just camped on his land), when you compare it to how hostile people are in London!


When back in the car we drove north stopping at Sligachan, fairly central to the Island, where a well known and recognised bridge is, we walked around, took some photos and were back on the road taking the A863 towards the west. Here, one can also drive more west than we did and visit the Talisker Distillery for a tour and tasting session, which friends have told me is excellent!


We slowly made our way to Kinloch Campsite, positioned right on the edge of Loch Dunvegan, which is an inlet from the sea. Here we freshened up, cooked up a Paneer and veg, tomato based curry and rice and had an early dinner.

A lot of the day had been wet/overcast, but started to clear a little in the last couple of hours of sunlight, so we headed for Neist Point Lighthouse, a kind of magical place I had seen photographs of, but wanted to see with my own eyes. The rock formations are dramatic and vertically fall from 100s of feet up down into the North Atlantic.


We waited patiently for the sun to seep through the clouds but unfortunately didn’t, still it left us with a moody skyline, which looked great. What we were unprepared for here (but in other areas also) were the swarm of midges (tiny fly-like insects which bite - think mini mosquitoes).
Day 4: Wednesday (Dunvegan - Staffin)
Wednesday was quite a casual day, we didn’t get up until late, ate breakfast overlooking the lake, and set off east. We drove to Uig, and from there drove around the Northern coastline on the A855; a beautiful single track road with stunning views across the Harris Isles. It felt very remote and during this part of the trip we saw fewer cars than in other places. We found ourselves when driving this part stopping every 5 minutes or so to take in the awesome views and take some photos.
We stopped off at the Single Track Coffee Shop, that sold us some very good quality coffee and amazing chocolate brownies! I think what really made this cafe though was the stunning views. Would highly recommend!


We drove on round the coast on our way to Staffin where we would camp the night at Staffin Campsite. I simple, but nice place, the owners seemed very hospitable and gave us quite a lot of advice about where we could eat or drink in the evening, however we decided to use up what we had and made salmon and pea tagliatelli over a BBQ, accompanied by a local beer!
Day 5: Thursday (Staffin - Portree - Fairy Glen - Quiraing - Staffin)
The weather when we woke was less than perfect; which was to be expected in Scotland in September, so we headed to Portree early to find coffee and a breakfast. Portree is Skye’s largest town, an old fishing village, with a beautiful harbour area and a few very nice fish restaurants, which we would experience later that evening. We had breakfast and coffee in Cafe Arriba, a very colourful cafe, with a good menu, coffee and Wifi. We spent an hour or so here while the bad weather passed, before we jumped back into the Defender and went on.


I had previously seen some images of The Fairy Glen in Skye, but hadn’t done that much research all I knew is there was a fairy-like castle and some stone circles in an area of mounds. We made our way here to explore the area, and I have to say when I arrived I was quite surprised that it did actually look like something out of a movie; it looked enchanted, beautiful little mounds, with one higher than the rest you could climb up; known as Ewan Castle.

We drove back to Uig from Fairy Glen, then took the single track road a little north that took us through a mountainous barren landscape eventually leading us to the Quiraing. The weather was unfortunately not good enough for us to get out for a hike, however I did explore the area a little.


We then headed back to Portree to warm up in The Merchant Bar, followed by dinner at The Lowerdeck Seafood Restaurant, I really recommend this place, I thought the prices were reasonable, the fish was fresh, and cooked very well, and we had mussels for starters, cooked in a curry sauce. On ordering I thought it would be a little strange, but actually a very refreshing change from the standard white wine and garlic sauce most places serve them in.
Day 6: Friday (Staffin - Old Man of Storr - Inverness - Carrbridge - Aberdeen)
Our final day, we woke early with the aim of climbing The Old Man of Storr, we arrived at the carpark at the base at about 7.30am, and started walking, unfortunately the higher we walked the more cloud cover came; the old man was well hidden in clouds while we were up, however it did offer incredible views across the landscape, the sun shining through holes in the clouds across onto the sea. By the time we had made our way back down to the car, and cooked up some noodles for breakfast it was about 10.30am and we had to be on our way, but the clouds around the Old Man of Storr had disappeared.


The rest of Friday was a lot of driving, having to cross the country, this time we went a slightly different way, headed to Inverness then through the Cairngorms, with a quick stop in Carrbridge, a small village which has an old stone bridge crossing the River Dulnain.

Scotland is an incredible place which has so much to offer, it has honestly left me thinking about when I will next return (maybe this winter!). Skye and the surround area offers vast and dramatic landscapes; great for road trips and hiking. Another thing I was really impressed with is that all of the attractions we went to, we never needed to pay an entrance fee, and weren't over populated, however we were just out of peak season. That said prices for other things; accomodation and food on Skye were fairly pricey, not far off London prices actually.
It’s an awesome place and photos don’t really do it justice, even the best! So go and explore it for yourself! And if you’re keen to explore it by 4x4, I’d highly recommend talking with Gary from Aberdeen4x4!


Portraits from Notting Hill Carnival 2017
One of the largest cultural calendar dates of the year in London; Notting Hill Carnival over the August bank holiday weekend. Since I've been living in London, I've been every year; rich with culture, loud music, fun, creativity, and a lot of rum! Whats not to love?!
I had the idea last year to try and put together a project to document the amazing costumes that are created for the event. I teamed up with Flagz Mas Band and created this series of portraits and had the pleasure and honour of seeing the whole event from inside, from the procession. An amazing weekend!


10 Steps to Making a Hand-Painted Canvas Photography Backdrop
Many of the Portrait Photographers who I look up to (JoeyL, Clay Cook, Luke Fontana, Miller Mobley) and am inspired by use high-end hand-painted canvas backdrops behind their subject combined with soft lighting to create a painterly image, these images are typically used in high-end fashion, editorial and advertising. To buy outright they are ludicrously expensive, and to rent, well….I wouldn’t have much of my clients budget after! I am by no means an artist in the form of a painter, and I am most certain my finished piece has nothing on one made by a professional like Oliphant Studios, however my initial thoughts were “how hard can it be?” and then went about working out the best way to go about creating my own.

Above: Finished Canvas. Model: Kamila Hussein
I spoke with artist friends, found blogs online, the best of which was one by a NY based Portrait Photographer Philip Vukelich and also a short video made by a UK based Photographer - Karl Taylor and then went about planning it. I documented each stage, so thought I would share :)
Below a little video to run you through my process, but below please follow the 10 step guide.
Step 1: Buy your canvas
On ebay I found 12ft X 9ft ‘Bolton Twill’ Dust Sheet; essentially a very tight knit, fairly thick decorators sheet, I bought 2 for £25.42 and it arrived within a couple of days.
Step 2: Source a space large enough to paint
Luckily enough I have a photographic studio in Stoke Newington, which was large enough and had a flat floor, however most garages should be large enough or even a drive, but just make sure the floor is very flat. Ideally a place which has good airing, to the paint can dry easily.
Step 3: Create a shopping list
PVA (1 litre) - which you will later mix with water 4 parts water to 1 part PVA to prime the canvas.
Bucket - to mix PVA and Water, and later mix paint.
Thick paint brush 6” or a paint roller (I chose paint brush as I felt I would have more control over the paint, and didn’t want any random flicks of paint going on anything else)
A smaller paint brush (maybe 2” - doesnt matter too much just so you have more control)
A string mop
Paint tray
Rag - old T-shirt or something (didn’t really use, only really to clean up)
Paint:
Base layer - Matt Black (I used 2 X 750ml tins)
Dark Grey (500ml)
I also bought a light grey, but it was way to light so never ended up using it.
Duck tape
Black bin bags

Step 4: Iron/Steam the canvas
I did this to get all of the kinks out of the fabric, as it was quite thin and had been packaged in a small wrapping, it had lines all the way through it so thought it best to iron it out first of all.
Step 5: Prepare the space
For this, and maybe it is a slightly unconventional way, but I cut black plastic bin bags, with a stanley knife so I could lay them flat with a maximum floor space, I taped them to each other and to the floor. You can buy one big plastic sheet, however when I looked they cost about £10-14, and the plastic bags were £1.20.
Step 5: Priming the canvas
Once it was ironed out and the black bin bags were on the floor, I laid it flat, over the top, and created a mixture which was 1 part PVA 4 parts water (roughly) mixed in a bucket, after mixing the liquid together I applied it with the larger 6” paintbrush (though you could also do this with a paint roller as well)

Step 6: Leave until touch dry
Leave for maybe 3-4 hours, I went off got some lunch, did some editing, and came back after about 4 hours, and it was touch dry.
Step 7: Reprime the canvas
As I did before, same mixture I went and painted the whole thing with a PVA/Water mix.
Step 8: Set up a fan, and leave to dry overnight
I left it to dry overnight, but also actually applied some weights along each side, nothing formal, just what I could find, a couple of ladders, a table, some wooden planks, and a marble wheel. I did this as I could see a couple of the edges starting to curl, and it was more of a precaution as I didn’t want them to curl any more.
Step 9: Base paint
Next day, about 15 hours after the 2nd coat of PVA/Water mix, I went about painting the base coat, I used a solid matt black paint, and watered down about 1 part paint, 3 parts water. It went on like black ink soaking it all up! I applied with the big/wide 6” paint brush, but had the smaller brush to dab any other areas which had been missed, especially around the edges where I needed to be a bit more careful not to get the black paint on the floor.
Step 10: Mix secondary and tertiary paints, and apply.
The final and the most crucial part, which i found a little stressful, and I emphasise that it is this stage which is the hardest, and you really need to just continue, however bad it might look like to begin with! I used the dark grey paint I had bought, then mixed the black and the dark grey in the paint tray. I then used the mop to dap the now black canvas.
The first few dabs of the ‘dark grey’ paint looked terrible, but I kept on, and tried dabbing to mix the ‘dark grey’ paint (which wasn’t that ‘dark’!) into the black, then used a combination of the black paint, and a mix of black and dark grey to layer over one another, slowly blending the colours into each other.
I didn’t time myself, but I reckon I spent 30-45 mins perfecting this, layering the different shades of grey on top on one another, really trying to blend the shades, while keeping/creating some interesting pattern with the mop string. After about 5-10 minutes I perfected a technique, so from there it was just about getting they print right, but the first 5-10 mins I left all my trouble was going to waste and this canvas was going to look horrendous, so please soldier on if the same thing happens to you!
I then left the canvas for about 15 hours, with a fan in the room, and the following day it was ready for a mini shoot :)
The total I spent, including all the paint, brushes, etc… and the canvas; £79.85

Exploring Wales with KamperHire
Approaching 30 and I realised I haven't seen much that is on my doorstep, in particular Wales, actually up until mid-May I had never crossed that border. It’s funny how joy of travel can take one far and wide to the most remote corners of the world, then you realised a place so close, so beautiful to your home you’ve not even attempted to go to.

I am now on a mission to see as much of the British Isles as possible, we have some incredible landscape, history, and culture here; a lot more intact than a lot of other countries!
I’ve recently returned from a week long roadtrip through Wales with buddy and photographer Usha Fath; starting out Monday 26th June and dropping our beast “Carlos-the-Camper” back on Sunday 2nd July to Mark from KamperHire, so wanted to write up a little run through of where we went and what we achieved in that period of time.

MONDAY
On Monday we drove directly from Winchester where we picked up Carlos to the Brecon Beacons in South Wales; a beautiful, yet rugged landscape, dramatic looking rounded mountain peaks, many (like us) headed to conquer Pen-Y-Fan, Wales 2nd highest peak. We parked in the Neuadd car park south of the horseshoe; walked on up to the Upper Neuadd reservoir and then west up to the ridge. From the ridge we walked north towards the centre of the horseshoe where we made our way up Pen-Y-Fan and Corn du which gave us breathtaking views across the Welsh countryside, with Brecon in the foreground and the rolling hills behind.
That evening we drove 10-15 mins away to another reservoir ‘Talybont’ where we sound a small carpark on the north western shoreline, and camped there for the evening.

TUESDAY
In the morning we rose and made our way to Brecon, a small quaint market town and had coffee and a breakfast while doing a bit of research into the road and weather ahead. Over this coffee we defined our plan over the course of the next 6 days.

We headed west towards Pembrokshire, in particular we had seen and read about a beautiful looking surf beach called Freshwater West – a large sandy beach, backed with dunes and cow fields with a road running round and along the coastline. Despite on arrival the Welsh weather not being on our side we sat tight, brewed some tea and rested. Soon, the grey, wet clouds started to clear as golden afternoon rays of light spilled on the sea in the very distance, highlighting some of the coast line. Within 15 minutes most of the sky had cleared giving us pretty much the whole beach to ourselves.


Pictured here (right): My lovely new copper water bottle from www.copperh2o.com
We then ventured on around the coastline to St Govan’s Chapel – a small holy building built into the cliff face, a perfect place to spend the last few hours of sun. We went back to our VW Campervan and set up for dinner; fried kippers in ciabatta with chilli mayo and salad, accompanied by sautéed new potatoes in mixed herbs and butter, and cooked up fresh inside our campervan.

WEDNESDAY
On Wednesday we woke early with the aim to catch sunrise, we drove to a little fisherman’s village and National Trust site around the corner for Barafundle Bay. After clambering over the rocks to catch the fishermen setting off on their day’s work, we walked around the coastline a little more to Barafundle bay looking for interesting angles to capture the large (almost tropical looking) beach.

Backpack pictured from www.venque.com
After we set off for another small fishing village I had heard of before; Porthgain in north Pembrokeshire where we cooked up an English fry-up in the van which we ate overlooking the small harbour and ordering our coffee’s in from the local tea shop.


The rain soon started to kick in, so after a while chilling and reading we drove north headed for Snowdonia, headed to a campsite for a little TLC accompanied with a hearty leg of local Welsh lamb for dinner in the local pub ‘The Oakley Arms’ and a some local traditional music to our astonishment.
THURSDAY
From a little research a few days prior I had found an interesting looking landscape and road perched up in the mountains by a reservoir just outside Blaenau Ffestiniog so after a morning coffee that is where we headed. Unfortunately we found it to be a private road, so while it was fine to talk up we couldn’t drive our VW beast Carlos up there. The landscape was breathtaking, and the curves wound like a snake down the mountain around boulders and rock formations.


The afternoon ended in a wet state, so we found shelter in the lovely town of Betws-y-Coed; quaint, cute and very wet is how I will remember it. We camped in a campsite just out of town.
FRIDAY
The day also ended up to be a bit of a washout so we spent a lot of it resting, and editing images in a café. In the late afternoon the clouds seemed to part and we made our way to Llyn Gwynant, a lake with a campsite at the north, westerly end. We went off to find dinner in an equally beautiful small town to the evening prior, called Beddgelert.

SATURDAY
We awoke on our final day to find the sun glaring, something we hadn’t seen too much of in the past few days, we set the camper up for some hearty breakfast, showered, got ready and then went off to climb the Snowdon Peak. The sun stayed strong for the majority of the day but about 10-15 minutes away from the peak and thick cloud came in to cover us, meaning we weren’t able to see the sights we were hoping for, but we were able to touch the very peak which was enough sentimental value to return back down the mountain. Before I came to Snowdon, I wasn’t aware of how mountainous these parts were, vast, beautiful, green valleys, with the peaks towering above you from both sides. Dramatic landscape that really gave me the feeling of adventure.


From here we travelled back to Winchester to deliver the camper back to KamperHire, passing through Shropshire and The Cotswolds. Wales is a truly amazing place, somewhere I could see myself living in later life. I am to return maybe in autumn or perhaps winter with the hope of seeing some of these peaks dusted with snow, until next time! :)
The Lost Kingdom of Mustang
I’ve travelled a fair amount before, and for the vast majority have always had a camera at my side documenting the various trips. However this most recent trip was different; I set out with a plan, I had researched the area of Mustang, Nepal extensively, had learnt about its history and thought I had a somewhat clear idea of what to expect when I arrived; how wrong I was!
I first heard about Mustang about 6 months ago; a lost Kingdom, hidden in the Himalayas, part of Nepal, bordering with Tibet. The people of area were of Tibetan ancestry and were known as ‘Lhobas’. They lived a simple life, very rich in Tibetan Buddhist culture, which has been preserved well, and to my understanding you could almost experience what Tibet would have been like prior to Chinese invasion in 1950.
I was aware that within the past few years a road had connected Mustang to the rest of Nepal, prior to that there was a path (which was the route I took) however; wide enough and suitable for a family, and their Yaks or Horses…and possibly a motor bike, certainly no jeeps or such like. I wanted to see and experience Mustang now, before the area changed and had a lot of influence from western culture as a much of the world has now; I wanted to get off the grid. I knew there was limited electricity, simple accommodation and no internet; to me that triggers excitement!
The aim of the project was to visit the area, learn more about their culture, tradition, Buddhist religion, history, education, and document how all of this is being affected by better transportation, western influence and tourism.
I started off my trip by taking a small 16 seater plane from Pokhara to Jomsom, a small town in Lower Mustang where we; me and my guide Kipa, would start our trek.

It would be 6 days trekking from Jomsom to Lo Manthang; the capital of Mustang, where their Royal Family is based, within a Unesco World Heritage Site; a walled medieval city; which is recognised as one of the best preserved in the world from that time. The late King of Mustang was 26th on the throne, since his direct descendant Ame Pal, came from Tibet to Mustang, fought local warlords occupying the area and built the walled city in 1380 AD.
On route, we stayed in small villages in homestays/guest houses, ate a lot of Dahl Baht (veggie and lentil curries), spent most of our evenings with our hosts, drank a lot of tea and Roxsi (the local rice wine – similar to Japanese Sake).

The landscape through Mustang is like nothing I’ve ever experienced; barren mountain desert, canyons, not much vegetation; it is fairly unnatural to think that humans settled here at 3000-4000m above sea level, with icy cold winds, temperatures of -15C at night; but still the Lhobas have made it work. The scenery to me is majestic, I found myself stopping quite regularly when trekking; partly due to being out of breath from the altitude, but also because every corner, every direction seemed like an incredible view which I wanted to experience as much as possible.

On the 3rd day when trekking from Chele to Syangmochen we saw on the map a little detour to a Buddhist cave, so made the effort to go visit. I wasn’t too sure what to expect but the guide had explained that there were a lot of these caves across Nepal/Mustang and how it is fairly common for Buddhist Monks to go off and find solitude as the Buddha once did to practice meditation. A lot of these caves have had Monks live in them at some point in time, but the vast majority are not occupied. We were however in luck; we met Sangee; a Tibetan who had moved to Nepal as a refugee in 1992, he had immaculate English, so was able to talk with me for a couple of hours about his life, and a small history of the cave – initially found in around 800AD by an Indian Lama (Monk), and had over the centuries had different elements added to it. Sanggee had been there for coming up to a year, and we were the first people to visit the cave within the last three months as it had been winter in Mustang; meaning very few locals and no tourism. His daily routine consisted of waking about 4am, and meditation until 10-11am, where he would break for food, reading/learning and then meditate again from 3-9pm when he would eat, sleep, then repeat. Luckily enough we arrived during his mid-day slot.

Throughout the villages we stayed in we noticed a lack of people; a few places felt eerie like ghost towns where in the streets there would be literally a handful of people. I later learnt that since the road connected Mustang to the rest of Nepal the majority of people during winter go to Pokhara where the climate is a lot more forgiving, and usually return mid to end March, still a few weeks away for me.

I spent 7 days in Lo Manthang; which gave me a good opportunity to meet people who were in the city (in reality a small town), as the farming and tourism season hadn’t started it was quiet, but people had time. For such a small town; they estimate 160 families, they have three Monasteries, though at this time of year limited Monks, I counted 5 or 6. The Monasteries are a big part of the culture and life of the Lhobas; prayer wheels surround the city, and are found on every street. The Monastery dictates a lot of the lifestyle and calendar events throughout the year. Everyone is very religious, and actually up until recently every family would have their first born male inherit the family's wealth, and the 2nd born male become a monk. Also the education the Monasteries offer, again up until recently, was much better than the state. While on the subject, as people may be interested, up until recently women were able to marry multiple husbands, usually brothers; the elder and the 3rd or 4th born, as a way of keeping the wealth within the families but also coming from such a simple and limited background multiple husbands meant more provided to the family and any children.

I was lucky enough to witness on my first day in Lo Manthang an event that happens once a year; when the Lama of the local Monastery gives the local people his blessing to start their farming year. The event started out by walking around the local area, and positioning themselves in a field near the walls to the city. The Lama, and one carefully chosen man and woman had to go about ploughing a field while wearing their traditional dress. Later a few of the local people congregated to drink some of their locally brewed millet beer; Chang and some rice.
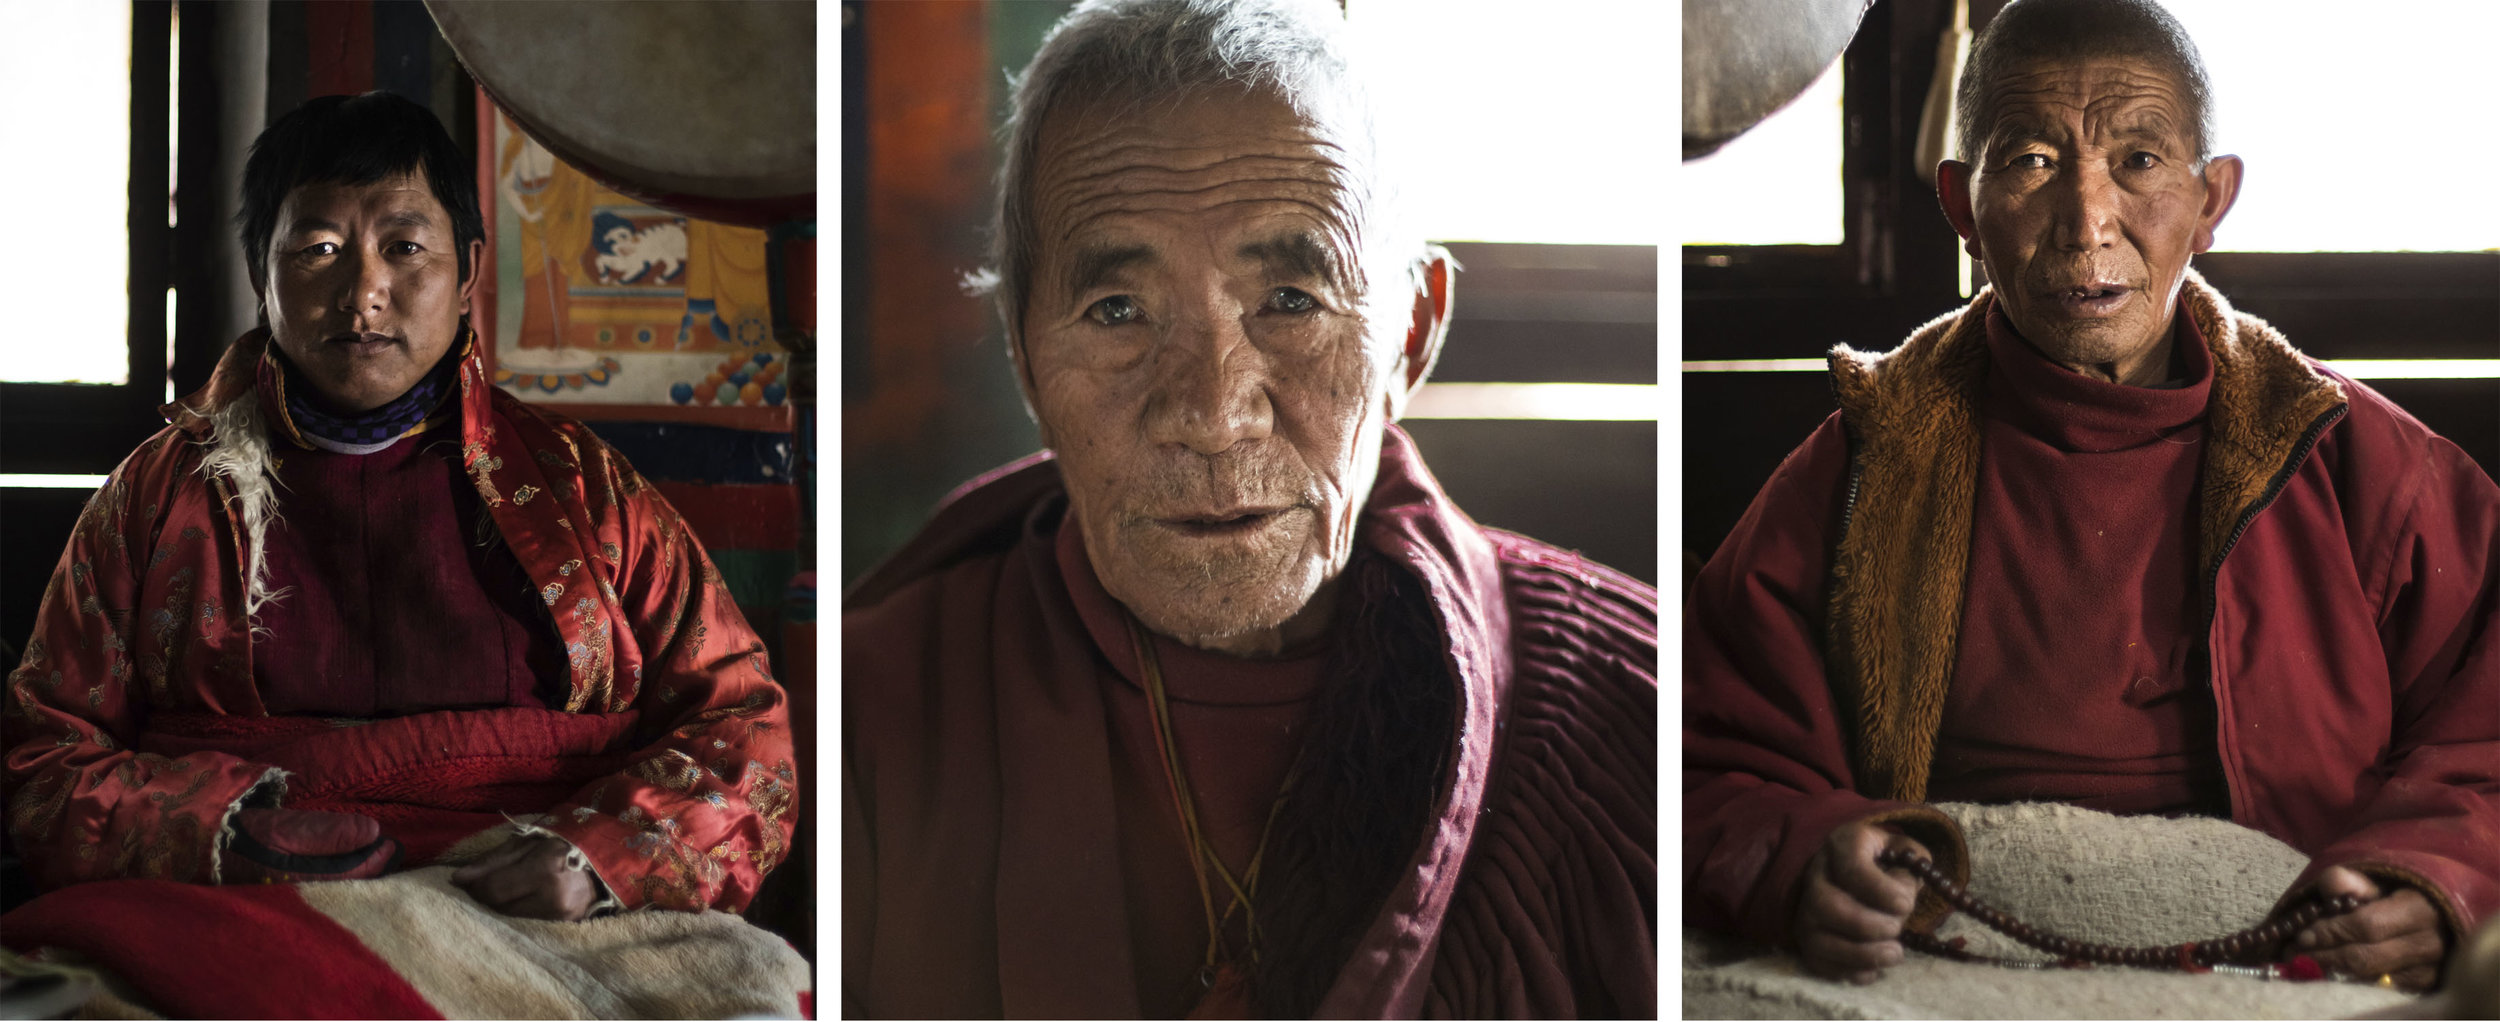
Below photographed a group of local women after the procession, and three portraits:


Some of the local men also congregate in another area of the town:


Pictured above a local school, they have three within Lo Manthang; one backed by the Monastery, another by the state and the third backed by the US. However, when talking to a number of the locals; they choose to send their children away to be educated from a young age; in belief they study harder without distractions from home; some educated in boarding schools in Jomsom (1 day by jeep), Pokhara (3 days by jeep) or further afield in India, where belief is that the education system is better, especially within their Monasteries.
During one of the days, I walked a few hours out of Lo Manthang to visit a Monastery I had read about; one of the oldest in Mustang called Nyphu Gompa, part of it is built into a cave, with a small residence of monks who live there all year round. On arrival they were amidst a prayer session where the Monks were playing a mixture of instruments from drums to horns to shells, while reciting mantras.


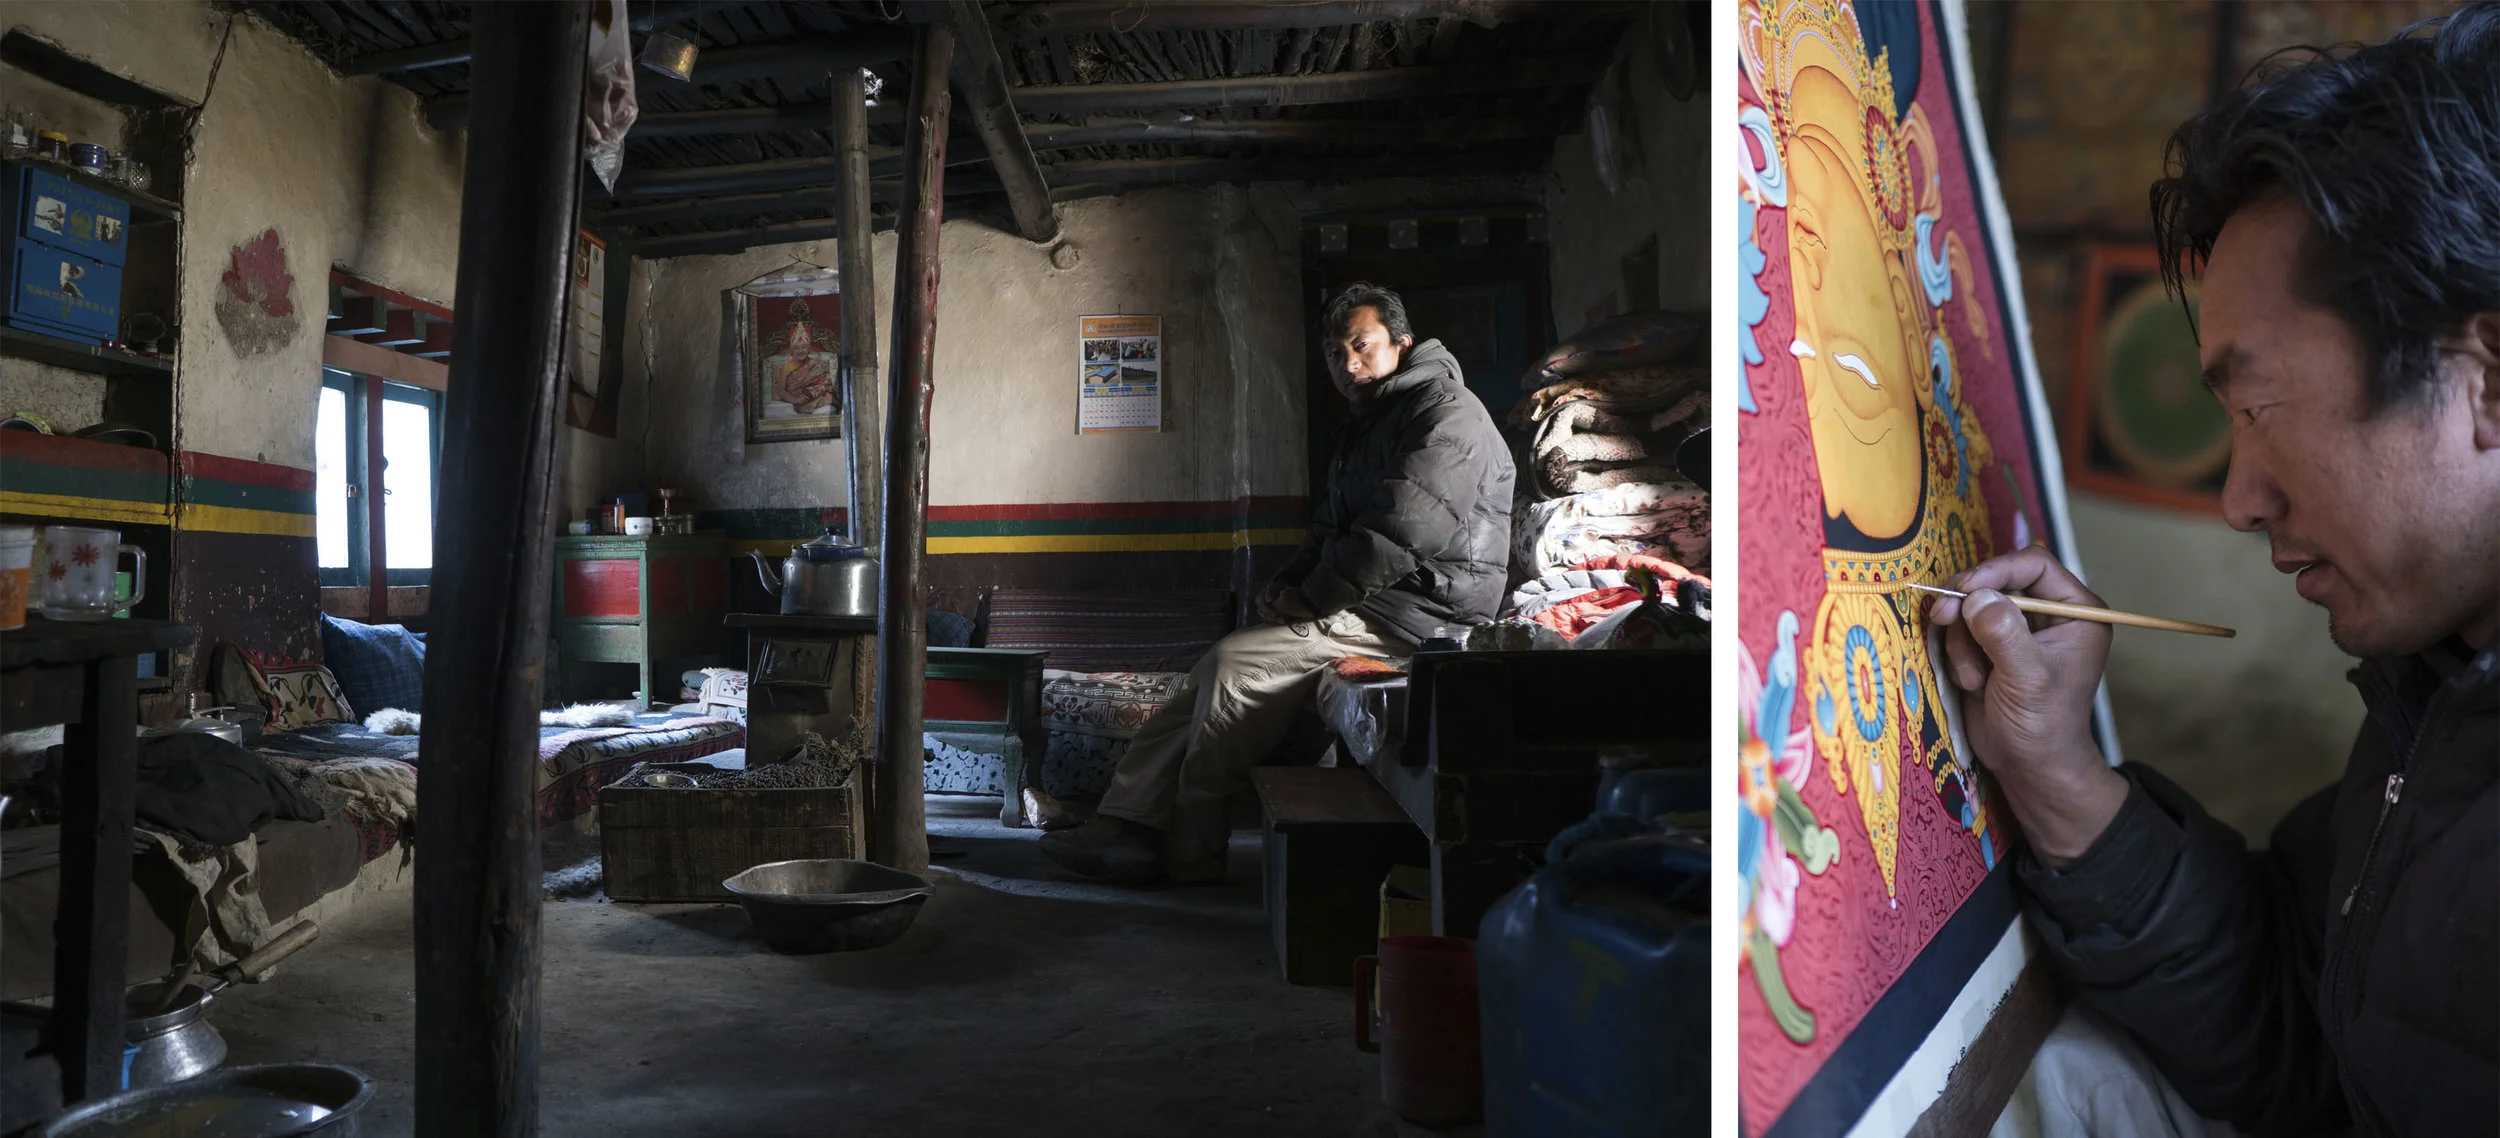
I met with two individuals who actually really made my visit in Lo Manthang, firstly a local artist who is one of the key contributors to the restoration projects in the Monasteries; Tashi. On meeting with him, he was super inquisitive about myself, and was very keen to show me around the city, including his family house, still laid out in the traditional way; ground floor for cattle and animals, and upper floor for family living; one kitchen/lounge which also he used as a home studio, a room dedicated to prayer, a landing area where his wife would hand make clothing and shoes, and a toilet. Below is a portrait of Tashi in his Kitchen/Lounge/Studio.
Secondly; Karma, who despite his broken English and my non-existent ability to speak the local dialect; an evolution of the Tibetan language, spoke at length about Nepalese politics, the Royal Family of Mustang and the power of the Buddhist faith in Mustang. He showed me around the town, introduced me to a number of people, and most importantly took me to the local Chang House; AKA: Pub. Where to my amazement I found two rooms, everyone drinking the local millet wine; Chang, one small crowded room of men playing a dice game, all gambling, and another with about 7 or 8 men sat around watching a satellite TV with Wrestlemania, cheering at smack downs! Below is a portrait of Karma, and an image of the Chang, as he handed me my first glass.

I learnt a lot from my time in Mustang; not only about the culture and lives of these people, but also about trying to plan and organise future trips and photo projects. The images I have as a result I am happy with, however they are not what I had planned for, or expected. In truth I was expecting a lot more of the local population to still be wearing their traditional wear, but the reality is they have swapped their Chubas for fake North Face jackets and New York Yankee baseball caps as fashion is now accessible and jackets are a lot warmer in their cold climates!
The biggest calendar event of the year is the Tiji festival, held every May. It is a religious event where a series of ceremonies are performed over three days to chase away evil spirits. For this all of the local inhabitants and monks from the surrounding areas attend to play a part in this very special event. I plan to return to Mustang to capture this event, and have been sanctioned by the Head Lama of the Monastery of Lo Manthang to photograph the event, and plan to share the images with the Monastery. Though I expect with will be May 2018 now.

On leaving Lo Manthang, a snow storm hit, so we needed to postpone another day, and the day following that we trekked for 7 hours through waist high snow along mountain passes, a tough day that will stick a long time in my memory! With this much snow, getting out of Mustang was going to be a very lengthy journey! We arrived in the town of Tsarang in the evening and learnt that the following day there would apparently be a freight truck leaving, driving along the river bed back to Jomsom, which we decided to take.
This didn’t come without its own difficulties as the truck had suffered axle issues, which were fixed on the spot with makeshift tools. The 8 hour journey, took myself, my guide and a couple of others down a treacherous river, which at points we were driving through 1-1.5m deep rivers, through caves and up 45 degree icy slopes. Below are a few shots from this part of the journey:

Above: Taken at the beginning of the journey, in a tea house. Sipping tea and eating noodles while the final amendments are made to the truck.

Above: Brute force is usually the best way to fix a mechanical problem with your vehicle.

Above and below: A quick stop; routine check that the truck isn’t falling apart.

I had planned, and still do an exhibition of a selection of portraits depicting life and culture in Mustang, however this will now be once the project is finished, after I have returned to the area for the Tiji festival mentioned earlier in the blog. Likely to be May 2018. Over the coming weeks I will be uploading a series of portraits taken from this trip to my website. Should you be interested to find out more about the area or more about my trip, the local customs, etc… please drop me a message, I’d be very happy to share more :)